Friday, 14 November 2014

World Nursery Rhyme Week 2014

The focus this week has been World Nursery Rhyme week. The idea was to sing and do activities around the theme of five nursery rhymes as set by the organisers.


The chosen songs were:-


  • Monday - Old King Cole
  • Tuesday - Hey Diddle Diddle
  • Wednesday - I Hear Thunder
  • Thursday - Oranges and Lemons
  • Friday - Five Currant Buns

The organisers had put together a resource pack, but I didn't think much of it. Generic clip-art just didn't hit the spot.

Monday - Old King Cole

The first thing we discovered was I cannot hold the tune of Old King Cole. To M's amusement I kept singing a harmony to the original melody. After my failure to sing properly, M showed me how it was done, holding the tune beautifully.

Next up, some crafts in the form of 'K is for King'.

I drew the K and crown for M to cut out, I also drew a pipe (as in a musical instrument) and bowl, the latter complete with a straw as historically bowl may well have been a drinking vessel. Otherwise this K is entirely M's own work.


K is for King.
We went through a lot of glitter glue.

The K complete, M drew a lot of pictures of King Cole and then made up stories about the poor King’s misfortunes. In M’s tales, the Fiddlers try to rescue the King from many unfortunate situations which start when he forgets to put his pants on, but can’t be bothered to take all his clothes off again so pulls them on over the top of his leggings. All is well until he needs a wee.

Tuesday - Hey Diddle Diddle

Dave took this one as I was at work, helping M to make puppets on sticks so she could act out the story.


Hey Diddle Diddle puppets.
Wednesday - I Hear Thunder

I think Dave was lucky to get this one, as I’d prepared a project on Rain a few weeks back which he could dip into!

M started on this as soon as I left for work, with Dave getting out the percussion instruments for a good old sing song. When Dave felt he’d entertained neighbours for long enough he started on arts and crafts.

I am still waiting to see what they got up to…

Thursday - Oranges and Lemons

I was stuck on this one as I couldn't find arts and crafts projects that were suitable for a four year old, but also likely to catch M's imagination. In the end I decided it was time for a spot of baking.

We made lemon drizzle butter cookies using my standard easy butter cookie recipe, but adding lemon zest to the mix, then topping them with lemon drizzle icing.

For reference:-

6 oz butter
9 oz plain flour
3 oz sugar
zest of one lemon

We put all the ingredients into a bowl and used our fingertips to mix them together. Or rather, I did. M played with the mix, squeezing and rubbing with her palms and enjoying the sensory experience. It didn't matter though. We've made these biscuits before and they are very much foolproof, hence why the recipe is a favourite of mine.
Rub between fingertips until you get a breadcrumb like consistency.

When the mixture reached breadcrumb consistency, we kneaded it together into small balls for rolling out, which I did very gently onto a lightly floured surface. M had a go at rolling out, but this dough is very crumbly and needs a light touch, whereas M tends towards heavy handed with a rolling pin. M had chosen cutters in the form of church bells and candles as per the song and we cut out shapes together, placing them onto greased baking trays.

We pierced the cookies with a fork a few times, then put them into a warm oven (150c) for 12 minutes to bake. Once they were cooled, I drizzled icing made from icing sugar and some of the juice from the lemon I’d zested. I was careful not to overdo it here, the cookie on its own is slightly lemony and I wanted to make sure M would enjoy them rather than be put off by a strong lemon taste. M could have done the drizzling herself, she is good at drizzling having practiced a lot, but my girl was looking tired and said she wanted to watch.
Lemon drizzle butter cookies.

The resulting cookies were very yummy.

Friday - Five Currant Buns

I hadn’t intended to do anything for Five Currant Buns as we’d have normally gone out to a weekly home education meetup in Rugby. However M has had such fun this week that she insisted we stay home and do something today too. She awoke this morning full of cold so I decided a day at home probably was the best course and I suggested we could make five toy currant buns.

We had a bit of confusion as to what a currant bun was and what it should look like, so I asked M to draw a picture of what the buns should be like:-


M's drawing of the ideal currant bun.

While I agreed this looked like a fantastic currant bun, I couldn't see how we could make five buns just like this out of felt in a single day. I’d have wanted to draft a pattern and make a prototype to confirm it came out exactly right. I suggested a compromise, explaining that until recently buns tended to be shallow rather than tall and if M thought about our own buns, they tend to be more like a round cushion.

M insisted that any bun should have icing and a cherry on top, which I agreed with and so we got to work. I drafted a simple pattern template and M helped with pinning it to the felt so it could be cut out. M then pinned the icing to the tops so I could sew them, allowing me to get started on the construction which she watched carefully.

Stuffing the buns was M’s job as was choosing five cherries, i.e. five suitably sized red pompoms. M positioned the cherries in the middle of each stuffed and sewn bun, so I’d know where to sew them, then her mind turned towards sprinkles. Glitter seemed the ideal solution, so M applied glue and glitter to each bun once I’d attached its cherry.

We used PVA to stick felt currants to the bottom of each bun, but it didn’t want to stick so I switched to Tacky Glue, which is thicker PVA. Sadly this took an age to dry and by six, a tired, congested M had had enough of waiting. Playing had to happen, glue or no glue, so play and sing, sing and play we did. Resulting in one very happy little girl.
Five currant buns in a bakers shop, round and fat with a cherry on the top.

I’m really pleased with the way these toy currant buns turned out. I did all the sewing here, but M has been learning to sew using little felt kits with precut pieces and pre-punched holes. This was the first time she’s seen a sewing project through from original idea, design, pattern (OK very simple, but it was a pattern), cutting, pinning, construction, stuffing and embellishing. A slight hiccup with the glue and currants aside, it all came together to give her a functional toy. M has ended the day riding high on the sense of accomplishment this has given her, which has got to have been worth the time spent on those five little toy cakes.


Tuesday, 5 August 2014

Showing restraint

It might not sound significant, but as a baby my daughter was born with a full head of hair, most of which disappeared within a few weeks, leaving her with a few sparse wisps over her adorable little head. This was not a problem. My daughter grew into a hat wearer.
M wearing a hat made by Mummy.

Hair styling has never been my forte. Hair styling, when the hair in question is extremely fine, thin and belongs to someone who cannot stand still for more than a few minutes at a time, has proved a challenge. Like most mothers, I’ve resorted to time honoured methods for keeping my little one’s hair in check. I’ve tried braids, but M doesn’t like to wait as I complete the task. I’ve tried alice bands, but they slip off, rarely staying in place for more than a few minutes. Pigtails were popular for a while, but as M’s hair continued to grow in length but not in body, they turned into lethal weapons on either side of her head. M took great delight in swinging her head from side to side, hair whipping her face with alternate strikes across her cheeks. These days, the mainstay of hair restraint for M is the good old fashioned ponytail. I wanted a child sized hair tie that would stay in place, wasn’t slippery and wasn’t too big because it assumed you had a lot of hair. I made something. This was an experiment. I’ve never made a hair accessory before and couldn’t find anything that was just right on Ravelry, so I improvised. I tied some left over 8 core elastic into a loop, then crocheted over it to give me a base. I then added a simple chain mesh, until it had some substance. And here we have it, a child sized lace scrunchie.

A simple crochet mesh scrunchie.
A simple crochet mesh scrunchie with hair.
This scrunchie is worked in a standard crochet thread (size 10) on a 2mm hook. Guage doesn’t matter in this case, it was more important to use a hook that worked well with the thread.

Method:- I put a foundation row of dc in multiples of 5 stitches around a piece of elastic, covering it. I then worked a 5 stitch chain mesh into this row, as follows. R1 - ch5, skip 4 dc, dc in next dc, repeat until end of round. R2 - ch5, dc in next 5ch space of previous row, ch5, dc in same space, repeat until end of round. R3 - ch5, dc in next 5ch space of previous row; repeat until end of round. R4 - increase in alternate spaces. R5 - as for R3. M likes it. Enough said.

Monday, 9 June 2014

And That's Teamwork

M is a girl of many passions and has an eclectic mix of interests. Cars, trains, heavy plant, horses, sheep, cows, yarn and ballet are all daily conversational topics in our house. M also loves art and craft, treating such activities as a co-operative, collaborative process which accounts for most of my efforts on the crafting front these days.

It should come as no should come as no surprise to me that flicking through an old Early Learning Centre's catalogue looking for collage inspiration should come to a halt at picture of two girls running through a field dressed as princesses. M immediately cut the page out and then in half, effectively removing a Disney-esque outfit.

"Mummy, trace her!" M said, waving the remaining little girl at me before continuing.  "Then transfer her onto a piece of paper twice."
Traced images
And so started the current obsession with this image.
Colouring...
I trace, transfer and draw over the top, darkening the lines. M colours it in. We're a team. :-)

Wednesday, 21 May 2014

Introducing Miss Sophie

On Easter Monday, I finally got to visit Toft Alpaca's which was holding an open day. We had a fantastic time and the alpacas were a big hit with M, who thoroughly enjoyed walking her own alpaca around an obstacle course (with a bit of help from Mummy). M chose her own animal, picking the feistiest alpaca available which meant it was given to sneaking cuddles and sitting down while we were trying to walk it.
M walking an alpaca (with Daddy's help, while I take a quick piccy)
M however was smitten.

The next day, M was inspired and so she made her own alpaca herd. She also decided I needed to knit something.
An alpaca in progress...
Now, anyone who has read back through the archives of this blog will know that in the dim and distant past, I used to knit quite a bit. Not one to let a good opportunity pass, I cast on immediately. I was very relieved to discover that my fingers remembered how to use two sticks and some string to produce fabric!

By picking up and knitting whenever I got a spare moment, within a week I'd amazed myself by producing this collection of bits:-
Knitted bits...
Which when sewed together and stuffed (with lots of help from M), became this:-

Ta da! Miss Sophie Bear.
M immediately named the bear Miss Sophie Bear and I began to work on phase two - a ballet outfit. In the meantime, Sophie began to explore the world around her and turned out to be quite an adventurous, outdoors loving bear.

M and Miss Sophie explore a hedgerow at Brandon Marsh.
The pattern I was working from, within a book of charity knits called “Knit Together For Short Lives”, published by Hobbycraft. The original pattern was by a lady called Val Pierce and as far as I can tell, the basic bear comes with lots of options for clothing, according to occasion. The big stumbling block with the patterns in the Knit Together book, was the assumption that the clothes would be sewn onto the bear. M had very definite ideas that she wanted a bear that she could dress and undress, which of course meant I had to modify Miss Sophie’s clothing to allow this.

I started with the ballet dress from the book, knitting it as per pattern but adding a crocheted tab on one shoulder to hold a press fastening. I had left over tulle from M’s tutu, which was pressed into service for Sophie’s skirt and I raided my ribbon bag for lace trim picked up from Croft Mills a few years back.
Miss Sophie's tutu - added shoulder tab, ribbon at waist, lace trim at the hem.
A close up of the tulle underskirt - I added maybe four times the amount recommended by the pattern.
Rather than sewing flowers or pre-made bows onto the dress, I opted for sequins, of which I have a huge stock  for general craft purposes. I’d intended to just put a few butterflies and flowers onto the bodice, but once M saw that sequins can be sewn onto things, she was hooked. I did dictate how big the sequins could be, but otherwise M directed and I did the sewing until Miss Sophie had a dress fit for a ballerina bear.
Teeny, tiny ballet slippers.
The final touch was the ballet slippers, which proved to be a challenge. In the original pattern the toes are stuffed, then the slippers are sewn directly onto the bear’s feet. For Miss Sophie, I stuffed the slippers’ toes, before sewing in a tiny knitted (eight stitches by eight rows in stocking stitch) panel to keep the stuffing in place. Ribbons tie the slippers onto the bear’s legs.
Miss Sophie Bear, complete with tutu and ballet slippers.

Back view of Miss Sophie's tutu.
And there you have it. One ballerina bear.

All pieces were knitted from standard cheap acrylics in DK weight, on 3.25mm needles. I used a 3mm hook for the crocheted extension. Apart from the ribbon, which was bought for this project, all other materials came from my stash of crafting bits. M was delighted and is now designing the rest of Miss Sophie’s wardrobe.

As for me… Gosh, it feels good to have knitted something. Really good.

Tuesday, 31 December 2013

Chocolate and Mittens

Christmas seems to have practically flown by this year. M and I did a lot of cooking on Christmas Eve, making chocolate truffles, shortbread festive biscuits, mince pies and jam tarts (for M, who doesn't like mince pies).

I cheated on the pastry, buying pre-made as while M loves making it, she also enjoys handling it and working it a lot, sadly to the point that the pastry becomes impossible to work. I managed to roll the pastry myself, prepared the mincemeat by adding chopped apple to shop bought and M filled the pies and decorated them.

It was a successful compromise, with both pies and jam tarts turning out well. No photo's I'm afraid, as I forgot!

We made chocolate truffles using this recipe and they turned out very yummy. M enjoyed making these, the ganache was easy enough to do but I left it in the fridge for a few hours and it came out very hard, which made rolling it into balls a bit difficult. For this reason our truffles look a bit rough, but this didn't detract from the taste.
Chocolate truffles - surprisingly easy to make.
M and I also made a few Christmas decorations:-

A ballerina, a queen and a king (rather than three kings)

A Christmas wreath

M tackles the problem of how exactly do you glue tinsel?
I tried my hand at making two tutu's; one for M and another for my niece.

A tutu for M
And finally, I managed to finish the mittens I'd been working on for M. Both M and I have long fingers which means that shop bought gloves and mittens are often too small. One of the benefits of making your own is you can make them roomier.

Mittens - colour chosen by M
Based on the child version of the mittens in Pauline Turner's How To Crochet, these mittens are worked flat on a 4mm hook. The cuff is worked into the back loop on a 3.5mm hook and the thumb is made separately. I had problems with the thumb as the numbers in the book didn't work so I did my own. I also enlarged the hand, starting with 16 stitches and increasing as described in the pattern until I had 28 stitches. I worked a deeper cuff too (10 stitches) as I find that means they stay on, even when worn by someone with flappy arms and wiggly fingers.

Happy New Year!

Sunday, 22 December 2013

A tiny snowman

Life and general business does seem to have caught up with me of late, hence the lack of updates here. Christmas preparations have taken central stage over the past few weeks and finally, with only one present still to wrap I'm about ready to settle back and enjoy the holiday.

While browsing the internet with M, we came across these little fellows and so, with encouragement from M I made my version.

One tiny snowman having fun at the park.
M has yet to name her, but while technically this snowman (snowgirl) is intended for the Christmas tree, I doubt she'll make it there. M claimed her as soon as the last stitch was in place and yesterday she took her first visit to the park, where she played on the swings, roundabout and climbing frame.

Thursday, 3 October 2013

L is for Leaf

The seasons are changing and as the leaves fall from the trees, I thought I'd take advantage when it comes to thinking up craft activities for M. With this in mind, we collected a bag of leaves while we were wondering around Mary Arden's Farm at the weekend enjoying their Apple Weekend celebrations.

We also bought two apple trees from someone selling heritage trees. Dave spent a good half an hour talking to the man before making his choice, following my request for more productive plants in the garden. Unfortunately Dave has forgotten the name of the apple trees he (or technically we) bought and all I can say is the sample apples were tasty! The challenge now is to remind Dave to water them whilst they are still in their pots and make sure they are planted before November.

Back to leaves, I'm keen this year to do more seasonal crafts to try to instill in her a sense of change as the year moves on.

We started on Sunday with a little leaf rubbing, M's first attempt and it's more difficult than you might think. I helped by putting the leaf upside down under the paper and holding everything still, so M didn't keep trying to reposition it above the leaf. M was very enthused and managed to get a fair print of the leaves, even though she was rubbing a little too hard. After that M practised her cutting skills cutting the leaf out, highlighting to me just how complicated a shape a real leaf is!

M's attempt at leaf rubbing and cutting out...

M did the rubbing, I added an outline and cut this one out.
This was certainly one the more difficult craft tasks M has attempted and I don't think she did too badly, considering she's still learning how to use scissors.
I did a rubbing too!
The surviving paper leaves are now adorning my kitchen door, where they keep unsticking themselves and floating gently to the floor, nicely emulating the real thing! I suspect we'll add more to the door before the season is done.

After the success of leaf rubbing, I decided to do some simple collage, starting with L is for Leaf.
L is for Leaf
As M (who is a stickler for detail) pointed out to Dave, the L is made of cardboard, not leaves, the leaves are glued on. I decided to use PVA for the glue this time and was disappointed by its lack of stickiness. We put the leaves on, but being irregularly shaped, they just wouldn't stick immediately until the glue dried a little. I solved this by putting heavy 'small things' on the leaves while the glue dried to a tacky consistency. I really am going to need to look into good 'craft' glues, since this is bound to come up again.

M thoroughly enjoyed sticking leaves to the L and asked if she could make an M, so I cut one out for her and asked what she'd like to stick to it. M chose glitter and sequins, which she loves and generally never misses an opportunity to play with.

Here is her M, not as polished or specific as the L, but she enjoyed herself, spending over two hours in all on those two letters, sticking, playing, sorting and telling stories involving glitter, glue and sequins.

M says - M is for M and Mummy and Moon and Mask... Also Mountain fits perfectly
Now, I just need to think up more things I can do with leaves!

Monday, 23 September 2013

Pink Surprise!

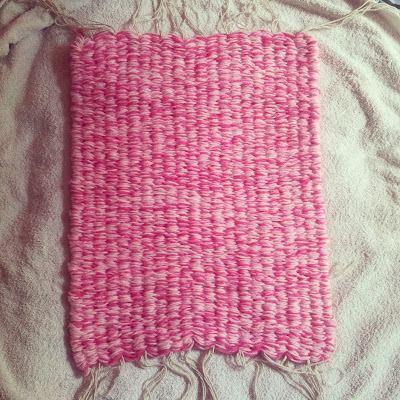
Spurred on by our visit to The Weaver's House as part of Heritage weekend, I finished my first attempt at weaving on a peg loom, hereby dubbed 'Pink Surprise!'
Finished first effort on the peg loom.
This was a collaborative effort with my three year old daughter M, who helped thread the warp, chose the weft threads and helped pull the warp through the weave when the pegs were full. M tried to weave, but didn't have the dexterity to do it just yet, although she had a lot of fun trying.

I used string for the warp, double threaded and three acrylic DK yarns woven as one for the weft.

A close up...
I've never woven on a peg loom or any kind of loom, so this project was a learning experience for me. I had a quick look at the instructions, then decided to just have a go to see how it turned out. I don't think the piece turned out too badly and I did learn a few things.

First up, the weave grows very quickly, much quicker than a comparative size piece of knitting or crochet but is very yarn hungry. This first test piece measures only 20in/51cm but used nearly 300g of yarn. The weft had to be bunched up fairly snug to conceal the warp, which will have contributed to the amount of yarn used and also how thick the finished piece is. While it does drape, the fabric is rug or heavy blanket weight.

It was difficult to keep the starting edge neat and from fraying or unravelling. In the end I used hair clips to hold it in place as I worked, removing the clips when it was time to pull the warp into the weave.

Keeping an even tension was harder than I expected it to be, with a natural tendency for the yarn to be very tight on the end pegs. I don't know if this improves with practice, but the result was the weave 'springing in' a couple of inches once released from the loom giving a finished width of 14.5in/36cm.

Taking the piece off the peg loom and tying off, revealed there must be an art or a hit of experience involved in keeping the tension even along the length of the warp too. Even though I tried to keep it level and Dave read to M so I had minimal help, it still came off with a definite curve at each end, with it very obvious at the starting end.

Once the piece was completely free and tied off, I discovered a snagged yarn on the underside near the beginning. I think it must have been caught when pulling the pegs or possibly when putting them back into the loom once the warp had been pulled through. It only happened once, but this will be something to look out for in future.

Finally an observation about my choice of warp. While I'm happy with string in this instance it isn't very pretty, so unless I intend to tuck it in, I might need to use something else in future projects.
I'm very happy with how the colours worked together.
Overall though, given that this was a first attempt I'm happy with the result and the colours chosen by M compliment each other giving a pleasing pink. We enjoyed making this piece, although I confess I have no idea what to do with it now!

Thursday, 19 September 2013

Heritage weekend

We took advantage of the Heritage Open Days at the weekend, although we weren't as ambitious last year when we did a grand tour of Coventry's Priory, Guild Hall, Blue Coats School and the old Cathedral. This year, we reined ourselves in, partially out of consideration for M's interest levels and secondly because of the weather, which was cold, cold, cold.

After some thought, we decided to keep it local this year and by that I mean a twenty minute walk to The Weavers House.

I've been aware of this building for a few years, but have never actually visited it. The Weavers Workshop, who are based at The Weavers House, were at The Herbert's craft fair last December, which is where Dave picked up my peg loom. It was a flying visit for us as I was feeling rough and M was poorly too, so I only chatted to them briefly at the time but they seemed friendly enough.

In short, we had an enjoyable hour and half in The Weavers House, which comprises a terrace of houses which were originally built in the 1500s and have been continuously updated since then. I believe they were occupied until the 1940s, indeed the gentleman working the front door said there used to be pub opposite which exploded due to WW2 bombing, but the terrace was left mostly unscathed.

The terrace had the feel of a work in progress, with one house restored to represent how a working class weaver might have lived in the 1500s, with a few additions for modern convenience (such as glass in the windows, a chimney breast and a tiled floor). Sadly, I didn't get to see past the hall (main living room) as M wasn't too keen on the dark, gloomy room or listening to the tour guide's (very interesting) talk. Dave stayed though and reported back that he had enjoyed it immensely.

We didn't pay too much attention to the garden, but M and I were drawn to the weavers themselves who had set up under a shelter. M played with the stick weaving samples and I had a long chat with one of the weavers about using a peg loom, getting a few tips about choice of warp as well as a few ideas in terms of projects. M was very taken with a giraffe woven onto a wire warp and a woven doll, both made with weaving sticks. I meanwhile was very intrigued by the idea of circular weaving on a normal peg loom.

I didn't get a chance to talk to lady who was spinning next to the hearth in the main reception room, but her presence, along with the whole visit has made an impression on M who has talked about it a lot since the weekend. The lady at the wheel was the only one in costume, which as someone with an interest in costume I found a bit disappointing but that's just me, I like costume. M does too apparently and was particularly taken by her hat (bonnet or cap) which M thinks was very pretty.

M came away with a few colouring sheets that she has put on her easel and has been working on for the past couple of days. Meanwhile, I picked up another set of weaving sticks and a small weaving disk. Following on from the inspiration of our visit and M's enthusiasm, we've started another braid, finished the piece on the peg loom (I'll post about that later) and started a project on the weaving sticks.
Weaving on two sticks
I really can't fault the place or the people there who were all very friendly and I certainly hope to visit again. 

Sunday the weather took a turn for the worse, adding a cold wind and rain to the mix. We had already decided to visit the Walled Garden in Allesley Park just as we did last year, but gosh it was cold.

The cold and rain kept a lot of the traders at their market away and forced the organisers to close early, but we made the best of it. M taught us how to play Hoopla, we did a bug hunt, I bought some veg grown on the site and M ran around a lot. We huddled in a tent for while, enjoying a very welcome pancake (and coffee for us adults) before heading briefly to the playground for a swing before coming home, but by then the drizzle had turned into heavy, cold rain, so we called it a day. Rain and cold weather however did not stop us from having fun, M certainly had a whale of a time.

And that was our Heritage Weekend.

Friday, 6 September 2013

Planning ahead

Today has been decidedly on the soggy side, leaves are starting to fall and I'm stalking M sized snow or ski suits in readiness for this year's Snowmaggedon.

In the meantime, I have started the lace project intended to be a summer shawl for next year as swatched for a few weeks back. I decided to use a 2mm hook, opened a new ball of Clea and made a start.

Here it is after three weeks of sneaking in a row here and there.
Main panel after three weeks...
Trellis with shell pattern, currently relaxed and straight off the hook
I'm still undecided on the final form this shawl is going to take. I'm thinking a big rectangle of trellis with shell, but don't know whether to add a border or two end panels. Currently I think I'll let it get a bit bigger and see how quickly it uses the available stash Clea, then decide dependent on appearance and whether I think I'm going to run out of thread. If I do need to buy more, I'll want to use the new thread for the border or end panels rather than risking a change in dye lot on the main panel.

Happily, M is finally accepting that Mummy might crochet because now the piece is started, I can work it while giving her a cuddle. Slowly. Very, very slowly, while M holds my hands and fingers, which she says is fun. M also tells me this scarf is for her Daddy, who needs it to be a bit bigger first.

Sunday, 1 September 2013

Tied off

I am happy to report that we finally finished the kumihimo braid we started in July. I've worked on this one with M, only weaving when M was in the mood and for as long as it held her attention which is why it has taken a while.
Braid taken off the kumihimo disk
We ended up with 20 inches or 50cm of braid for our efforts and only stopped because we ran out of threads to work.

The cardboard 'disk' held up fairly well, but was beginning to separate and split towards the end of the project. M was very enthusiastic, which in three year old terms translates into heavy handed when it came to moving the threads so nearly (accidentally) pulled the whole thing off the disk several times. It was easily fixed though; I just re-centred the braid, tightened up the tension and we were off once more.

M was very dismayed to see the braid off the disk so undoubtedly were going to have to make more in the near future.

Thursday, 29 August 2013

Introducing a peg loom

Following on from our initial experiment with weaving sticks, M and I got out the peg loom this morning. This was its first time out of the box since Dave gave it to me last Christmas, so today was a learning experience for both of us.

I had a quick scan of the instructions and then we got on with it. For this first attempt I decided to use string for the warp threads and three acrylics worked as one for the weft.

String because I wanted something durable for what is bound to be our first clumsy efforts - I don't want the warp threads to snap at the wrong moment. For the weft, three acrylic yarns worked together should give a fairly substantial fabric when we're done. Of course, both string and acrylics are cheap and are easily to hand in my stash, a definite bonus allowing us to just give it a go.

M and I took a long time to thread all 22 pegs, helped as we were by a mischievous balloon! To explain, M often involves her toys in our activities as if they were doing it themselves. This allows her to narrate their activities, scold them when they get too boisterous and generally increase her fun in whatever it is we're doing.

This morning M and her balloon were responsible for cutting the string after I had measured it out. M and the balloon then passed me a peg to thread before returning it to its respective peg.

An hour later the loom was ready to go, so I handed M a bag full of various acrylic yarns in DK weight to choose from. Initially M wanted to weave with all of them but I persuaded her to chose just three of them. After much consideration, M made her choice put all the yarns back in the bag and asked us to sing the choosing song. She then drew out three pink yarns and we sang a song for each of them (we sing a lot in our house).

And here they are on the loom.
My peg loom, finally set up and ready to go!
By this point we had been working on setting up the loom for nearly an hour and a half, which is a long, long time when you are only three. The balloon was tired after a lot of bouncing and needed a sleep. M decided she needed to do jigsaws - so this was as far as we got today.

Tuesday, 27 August 2013

Jesters, wheels and sticks

We headed off to Mary Arden's Farm again this weekend which was hosting a folk festival. We didn't really stop to enjoy the music but did hear a kids open mic from a distance which sounded fun.

We (naturally) made a beeline for the cows, so M could check on the calves. We fed some sheep and then checked on the (very big) piglets and the goats.

Then we found the jester and that's where we stayed for a while. M tried out a Pedal Go, with a lot of help from me. This is a simple toy described by the jester as the first step on the way to learning how to ride a unicycle. It had two foot plates or pedals set directly onto wheels which you had to stand on, pedal and go. M didn't quite have the weight or oomph to make it go by herself, but she gave it a good go.

Dave meanwhile showed us how to walk on stilts, did tricks with a peacock feather and tried his hand at plate spinning.
Dave has a go at plate spinning while at Mary Arden's Farm
M also had a go on  the stilts, with me holding her on and moving the stilts for her. She also tried plate spinning with help from Mummy. Sorry no photo's though, my hands were busy helping M so I didn't get a chance to whip out the phone!

A while later we headed to Mary Arden's house to check on the wells and garden. After that we stopped by the spinners and weavers again and this time M was fascinated by what they were doing. She was very taken with the spinning wheels and the peg looms. M had a go at the latter but the table was too high for her to reach properly and as a just turned three year old she lacked the manual dexterity to weave the yarn between the pegs.

M was very excited when I revealed that we do have both a spinning wheel and peg loom in the house, saying she would have another go when we got home.

Ahem... I think only a spinner would understand how nervous I felt at the idea of letting a three year old loose on my wheel. I did my best to be non-committal and changed the subject, hoping M would forget the whole thing.

M has a very good memory and reminded me about the wheel that evening. Rather reluctantly, I pointed it out where other sat under a dust sheet behind the television (well away from little fingers) and brought it out to little cries of "Oooh!" from M.

I spent about half an hour talking about the different parts of the wheel, bobbins and demonstrating treadling. M insisted on having a go, sitting at the wheel with her foot riding the treadle as I spun the wheel slowly. After that M helped change a bobbin and we sang Wind The Bobbin Up. M was satisfied. I put the wheel away and sighed inwardly with relief. All things considered, M meeting my wheel for the first time went very well.

The next day, M reminded me that I have a peg loom. Actually I have both a loom and weaving sticks, so I got the latter out and we made this...
Our first attempt at weaving on the weaving sticks.
I chose the weaving sticks over the loom for this first go because there are only five sticks in the set which made it a lot quicker to set up than the peg loom. M was very interested and had a go at the weaving as I guided her hand around the sticks, before allowing me to take a turn. M took charge of pulling the sticks up when they were about 2/3 full and a short while later we had our sample swatch. M put her scissor skills to good use and cut the warp threads for me so I could tie them off.

I'm now wondering what I could make with two inch strips of stick woven fabric!

Thursday, 22 August 2013

Today's spaceship

Space, the moon and aliens have been a hot topic of conversation in our house for a while now, inspired of course by children's books.

We regularly build spaceships or convert household objects for the purpose of trips to the moon. I thought I'd share today's spaceship.
Today's spaceship ready for take off
Built with lots of help from Daddy.
A spaceship being constructed in our garden
Books that M has particularly enjoyed exploring the theme of space are:-


Enjoy.

Monday, 5 August 2013

Maybe lace

Just lately I've recognised a need for lace in my life and my day to day life.

A few years ago I'd have scoffed at the idea, but back then I enjoyed summers in multiple layers of linen, cotton, silk and woollen semi historical costume which was great in terms of insulating against the summer sun. These days I go out in the modern equivalent of a single full length skirt with one shirt and I wilt in the tiniest bit of heat. What is worse, I've rediscovered the joy of potential sunburn.

This summer is the first with M where I've ventured out without a sling (which can double as a cover up) and I've resorted to wrapping a woven cashmere shawl around my neck and shoulders to keep the sun off. It looks garish and unorthodox but it works. I'm snug under my shawl but I'm not burnt and the layers work to provide a little much needed insulation.

M & I walking at Brandon Marsh, note the scarf/shawl...
The shawl has been such a success that I've been wondering if I should add suitable lace shawls to my summer wardrobe.

Of course this means I immediately decided I should make myself one. I do have a knitted WIP shawl sitting around somewhere but that required me to concentrate a LOT. Dave speaking was enough to distract me and the cobweb weight yarn was just so very slippery. Somehow I think knitted lace that delicate would be asking for stress right now.

So it was that I decided to start with very simple crochet lace. Initially I thought I'd just do some trellis work then later add a fancy border, but I feared boredom would be fatal and so I decided to add a shell.

And here are swatches.

Lace swatches, illustrating the difference between 3, 2.5 and 2mm hook (reading top, bottom left, bottom right)
The stitch pattern is taken from the Harmony Guide - Basic Crochet Stitches, worked in a size 10 thread in 3mm, 2.5mm and 2mm hook.

The thread is a cotton called Clea (Ravelry link) from my stash, left over from the humungous doily and gentleman's sleeping hat. I have over 1200m of this in white sitting in my stash and Clea is a soft thread suitable for clothing, so I'm hoping it would make a nice summer shawl. I just need to decide which hook gives the best effect.

M has decided to help with the decision and has informed me she likes all three swatches. M got to work immediately testing the swatches for comfort and drape.
Stripy Horse snuggles down with a bit of crochet lace
Meanwhile a bit of crochet lace makes an excellent blanket for a sleeping car
I'm currently leaning towards the 2mm for stitch definition, but I'm still mulling over the decision.