Monday, 25 July 2016

We try some weaving

Last week, we had a go at basket weaving using a plastic milk bottle as a base, taking it with us as a group activity for our local home education group meetup. Along with the other children, M found it fiddly as the plastic kept bending inwards. She got the hang of it after a while, but at six years old, M likes quick projects that produce fast results. She wanted the basket and did a fair amount of the weaving without complaint, but half way through wanted me to do it for her. I helped of course, but pushed her a little into completing her basket herself. The results are charming and M loved it, immediately taking both baskets (I made one too) and claiming them for her own.
Simple baskets woven on plastic milk bottles. The handles are also made from milk bottle. I've used Duck tape on the tops and handle to finish.
I wanted to build on the experience, but without the frustrations M had experienced working on the plastic bottle.

A while back, Dave bought me a book called Weaving Without A Loom (Sarita R. Rainey). Now due to life busy-ness, I've not really had much of an opportunity to try any of the ideas in this book, but with M getting a little older and following on from last week's baskets, I wanted to try some of the easier projects to see how she got on.

I decided to start with paper weaving, as the supplies are readily available around our house. We had a go at home so I could give M one to one attention, before taking the same craft to group the next day.

The idea is simple, we drew an outline in crayon onto a piece of construction paper, incorporating an area in the design to weave and representing it with parallel lines. The lines don't have to be regular in shape or length, they are there to be woven into. The design was cut out and the lines were also cut, making slits.

If I was doing this on my own, I'd have probably used a craft knife and mat, but doing this with M we used children's safety scissors. The lines weren't as crisp, but more than acceptable.

For our first attempt, I suggested we make trees as we are doing a project on trees at the moment. I also thought the shapes would be easy to draw and incorporate some weaving.

Once the design had been cut out, we cut some strips in a contrast colour and wove them through the slits. The ends were secured with a glue stick, then the whole thing is glued onto another piece of construction paper.
My design is on the left, M's is on the right.
In my case, I decided to cut the resulting design out, which could then have been used in another picture to complete the design.

M preferred to leave hers on the contrast paper as it was.

I thought it worked well. M had completed the brief, we both had acceptable woven paper designs, but M wasn't happy. She said my tree was beautiful but didn't like hers. I thought it was lovely, very Dr Seuss like and said so, but M protested that she wasn't trying to make a tree look like something out of a Dr Seuss book.

I suggested that maybe trees didn't inspire her in terms of art and that perhaps she could incorporate the weaving into another design. M's little eyes lit up and she immediately started a second picture, on a topic more to her liking.
M's ballerina with a woven tutu, complete with background figures. M elected to weave in a slightly different shade of blue.
And next day, without any instruction or help, she produced another similar piece at the home ed group.
M's dancer.
I meanwhile decided to make a goldfish.
My goldfish.
Paper weaving like this is certainly doable for small children. Her own designs have a certain charm and stand well on their own as pieces of art. I liked my own goldfish a lot. It was easy to create and I could see how it would build up into an interesting and eye catching collage.

Saturday, 9 July 2016

A girls first bike ride

Today's achievement was to get the tag-along bicycle up and running.

This has taken Dave a few weeks to achieve and it still needs some tweaking, but today we finally got to take the bike to the park for its inaugural ride.

M was super excited and could hardly wait as first Dave tried towing the tag-along, then I had a go before we allowed her to hop on. It has been about seven years since I last cycled, so the pressure was on not to fall off as I was the first one to pull M around the park. It was hard work! M has no bicycle experience, so doesn't know how to lean and was laughing a lot as we set up, leading to a lot of wobbling. Thankfully, I managed to pull out of the wobble but it was touch and go a few times. Hair raising stuff.
Dave and M, trying out the tag-along.
Once we were off, Dave and I took it in turns riding around the park for the next half an hour or so, before I declared it was time to stop. M didn't protest too much as I suspect her bottom had begun to go stiff. Instead she had fun playing with a couple of children for a little while, then we walked home.

I'd call the ride a success, but we might need to practice a bit to build up stamina for the Coventry Skyride, which we're booked onto at the beginning of next month.

Thursday, 30 June 2016

The Daddy Umbrella

Going back a couple of months to the beginning of May, May Day weekend saw us visit Clun for their Green Man Festival. Sadly, Dave's umbrella was a casualty of the battle between winter and spring. The weather was bad, with heavy rain and strong winds. A gust took Dave's umbrella, pulling it inside out and snapping the struts holding up the canopy.

M noted the loss and promised Dave a new umbrella for Fathers Day.

So began operation Daddy's Umbrella.

M and I talked, discussing what sort of umbrella she'd like to give to him and before you know it, M's talking about decorating an umbrella to make it special. This meant I had to swing into research mode, working out how she could decorate an umbrella without affecting its practical use.

We took to the internet, spending some time looking at pictures, M sketched out ideas and together we came up with a plan. M would paint an umbrella for Fathers Day.

The only issue was trying to find an umbrella!

Trying to find a plain white or blue umbrella locally proved impossible. We did buy some plain umbrellas for practice, but nothing that suited M's plans. In the end, we came across the Jolly Brolly website, M approved and two weeks before Fathers Day, the umbrella was delivered.

In the meantime, I'd also bought acrylic paint and fabric medium. Acrylic paint is normally water resistant, but it doesn't apply well to fabric. It is too thick, changes the consistency of fabrics and is prone to cracking when dry. Fabric medium can be added to acrylic, thinning it and reducing the impact of the paint on fabric. The plan was to use a 50/50 mix of medium and paint, allow it to dry and then fix it using an iron. Naturally, I'd use a pressing cloth to protect both the iron from the paint and the umbrella from excessive heat. I'd also taken care to avoid acquiring an umbrella with a plastic canopy as that would have resisted the paint and most likely melted at the sight of an iron.

M and I agreed that we needed a stunt umbrella. A semi-sacrificial umbrella, that she could paint to test the technique and prove it would result in a usable brolly where the paint stayed put. M decided that she would paint the Northern Lights coming across mountains. We looked at many pictures of the Northern Lights and M got started.
M paints her first umbrella.
Two hours and one painted sock later, we had an umbrella covered with swirls and dramatic mountains. It retired to the shed to dry for three days and then I ironed it. M volunteered to stand under it while I used a watering can to test how waterproof the paint was. Thankfully the paint stayed put and M was dry, at least until it was my turn to stand (or crouch) under the umbrella while M tested it with a watering can. M learned that water runs off an umbrella and if you are standing close to the overhang, will pour all over you.
The Northern Lights umbrella.
Satisfied with the result, we set the umbrella aside to dry and M worked on the design for the Daddy umbrella.

Several sketches later, M told me she wanted to paint the word DADDY around the rim with hearts above it. She would then paint pictures of Dave in various weather types above the hearts.

We had a plan and got started. I mixed the paint/fabric medium, M painted. I grabbed a brush and applied a second layer of paint, following M's lead. It took a long time and we started with the DADDY and hearts. The umbrella was a full sized golfing umbrella and huge, which presented problems for M who is not very tall and would be leaning over wet paint. I suggested we allow the hearts to dry, then paint in the Daddy's a couple of days later. M agreed, but this meant the umbrella was not finished in time for Fathers Day. We also decided to use sharpie pens to draw the outlines for the figures and pick out the edges of the hearts.
The finished Daddy Umbrella.
Finally however, after four days of drying time it was ready. I ironed it, we tested it and declared it done.
I think anyone seeing this will know it's owner is a Daddy.
As you can see, it is a sizeable umbrella and Dave should be very recognisable as a Daddy when out and about in the rain.
A very happy M who is pleased with the result.
M is happy and we may need to paint more umbrellas in the near future.

Useful websites:

Saturday, 4 June 2016

One last time

About a week ago, I finished the blue cotton cardigan I started for M back in March. Considering I swatched for this project in February, this means it has taken me over three months to knit a garment to fit a nearly six year old. I really am not a speedy knitter these days. Fortunately, M had asked for a summer cardigan so my timing is impeccable.

After a lot of thought, I decided to make the Sirdar simple cardigan one more time. I've already made this pattern twice before (last year and in 2014), so it was a familiar make. I wanted to make the cardigan in a size bigger than M, so for a 7-8 year old, which presented a challenge as the Sirdar pattern only goes up to 6-7. I was all set to rework the numbers, but started with my swatch and no matter how I tried I could not get my chosen yarn (Drops Muskat) to come out to the specified gauge of 22 stitches x 28 rows in stocking stitch gives a 10cm square.

I had two choices:

3.75mm needles 21st x 28 rows = 10cm
4mm needles 20st x 26 rows = 10cm

I could have tried dropping needle size again, but was worried about drape and ending up with a cotton cardigan which was too stiff.

After working the numbers, I decided to knit this cardigan with 4mm needles. The resulting gauge made the piece a couple of centimeters bigger across the chest, bringing the expected size closer to that needed for an eight year old, which was what I needed.
A finished cardigan.
Having made this cardigan before, I decided to mix things up a bit by adding stranded colour work to the bottom of the body and sleeves. This was a new technique for me and keeping tension even proved tricky, but I was pleased with the effect which was very pretty.
The back view.
I was astonished at how quickly this cardigan ate the Muskat. The pattern predicted seven balls and I'd bought eight. By the time I'd finished the back, I knew I'd be in trouble as I'd gone through nearly three balls! By my estimates, I'd run out of yarn on the second sleeve... So I hastily bought another five balls of the same dyelot, because I wanted enough left over to add to another project. I am so glad I did, as this project used nine balls of the main colour and one ball of the contrast.

The original Sirdar pattern calls for a knitted border, but the first time I made this I found the border wouldn't lie flat and the collar was messy. I much prefer a crochet border, so I decided to do my own thing.
Getting adventurous with the collar.
Stranded knitted colour work, with a spiked treble, eyelet and scallop edging.
M wanted a ribbon and a turquoise scallop to match the turquoise stranded work, I fancied doing some tiny scallops and spiked stitches, so we ended up with all of those things incorporated into the bottom hem, fronts, collar and cuffs. While I enjoy knitting, I'm more confident with crochet and as such I'm happy to experiment. At one point I was afraid I'd overdone it, but after the last stitch was placed, I decided the crochet finish brings the final garment alive. Finally, M chose the button to match during a trip to the local yarn store.
Collar and front.
The end result is a very pretty cardigan. It is deliberately too big, which is why it currently sits more like a jacket, but by this time next year I think it will fit my daughter well. She may even get a third year out of it!
A happy little girl.
M loves it, so everyone is happy.

Thursday, 26 May 2016

Simply lace shawl

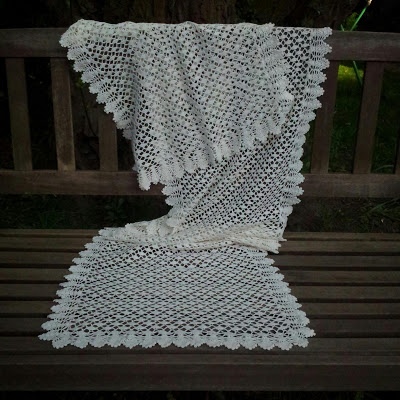
I finished this shawl over 18 months ago, put aside to block and completely forgot about it. I finally remembered it a couple of weeks ago, meaning I've been sat trying to remember what I did! Mostly this means studying the shawl, thinking back and being quietly amazed that something I made is this pretty.
Finished shawl. Isn't it pretty?
I started this shawl back in August 2013. It was intended as a long term travelling project which I could work on wherever I was, picking it up and putting it down as necessary. These days, time for craft is limited to random snatched moments around everything else, which has drastically impacted on my ability to actually make stuff, remember stitch patterns, maintain even tension or keep things from unravelling.
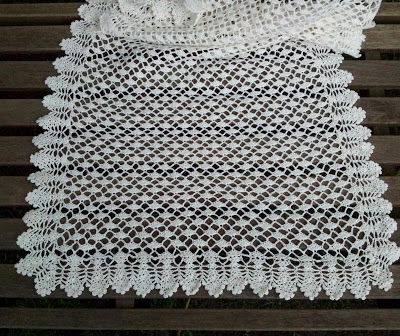
The main panel with its border.
My aim with this project, initially at least, was to make something that wouldn't matter if it wasn't finished. I wanted something to carry around, that would keep my hands busy, wouldn't require me to look at it or pay particular attention to what I was doing and would pack down small.

Lace might seem like an odd choice for this category of project, but if you choose a well behaved cotton thread and keep it clean (which for me meant the project lived in a plastic zip lock bag, inside a cotton bag), it is no different to working anything else. Cotton thread is thin but strong, the hook is tiny and the stitches are teeny but will open up on blocking to reveal their beauty.

I started off by deciding to use stash thread left over from another project. I  planned to make a rectangular panel and put a border on it. My thought was to keep going with the rectangle until it was big enough or I ran out of thread. At that point, I’d put either a border or end panels on, using a contrasting thread if the original thread ran out.

I didn't run out of thread, although there was a horrible moment, one row from finishing the border when I thought I was in danger of doing so! Fortunately, I managed to get that row made, otherwise I suspect this shawl would still be sitting in my working heap.
Overall this was an easy crochet. The repeat pattern was both simple to remember and intuitive to follow. The thread was well behaved and travelled well. I worked on it at home, soft-play centres, parks, nature reserves, historical houses and anywhere else that I found myself with a few minutes to spare. There were a few worrisome moments when I lost the teeny tiny hook down the side of the sofa, but otherwise it just kept growing. The main requirement was persistence on my part and the whole thing took approximately fourteen months to complete.
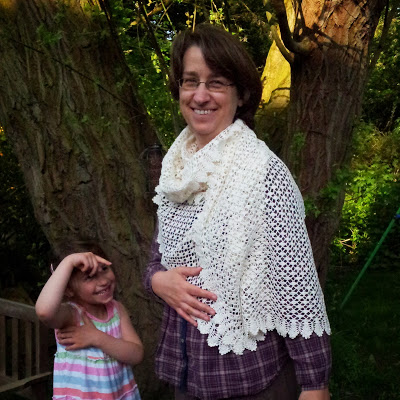
My daughter likes the shawl very much and has asked if I can make her one of her own.
Final Size
Unblocked - 43cm x 186cm
Lightly blocked - 46cm x 233cm
Final size after a light blocking was 233cm.
Yarn
Circulo Clea which is a #10 count sized thread in 100% cotton.

I had some white Clea thread in my stash, leftover from making a gentleman’s nightcap. I’d bought two balls initially, but only used about half a ball on the hat. From past experience, I remembered the Clea to be very soft, but easy to work with. The softness being important as I wanted a wearable shawl, so while I wanted to use a cotton thread I didn’t want something stiff and scratchy in the way of a thread more suited for doilies.

Hook
Worked with a 2mm hook.

My first stop involved flicking through the many stitch dictionaries I own to find a suitable pretty, not complicated stitch pattern, but with enough going on to keep my interest for months and months and months. I eventually settled on a shell trellis from The Harmony Guides:Basic Crochet Stitches.

I swatched with a 2mm, 2.5 and 3mm hook. Each swatch was washed, blocked and tested for softness. Eventually I settled on the 2mm hook as giving the best result with this thread.

Tension
I didn’t measure gauge or tension, I simply started with the correct multiple of stitches for my pattern and increased until I thought the shawl would be wide enough. The swatches indicated that the finished piece would be be stable in terms of width, only growing a little under blocking but I could expect considerable increase in length as the pattern opened up.

Foundation Row
I personally hate using chain foundations unless absolutely necessary. I find them fiddly, difficult to work the first row into and they can come out at a different tension to the rest of the piece, leading to either puckering or bowing. My preference is for the chainless foundation (or fdc using British notation) which works one stitch at a time, extending the row by placing a single chain in the previous stitch to act as a base for the new stitch. So much easier!

In this case, to support the shell and trellis, I started with a multiple of 12+1 stitches of fdc.

Main Panel
The main panel has a basic shell and chain trellis stitch, taken from one of the Harmony Guides.

This stitch pattern has repeating alternate rows of chain, then 5tr shells with 5ch in between each shell. The shells are worked and anchored at the sides, to the middle chain in the 5ch space of the row below using a dc. I've staggered the shells, rather than stacking them, to give the diamond effect because I thought it was more visually interesting. The chain between the shell rows is anchored with a dc into either the middle ch or tr (as appropriate) of the previous row. I just worked in pattern, putting a half shell (3ch, 2tr) at the beginning/end of the row as needed.

i.e.
Row 1 - 3ch, 2tr into the same stitch to form half a shell. *Skip next 2 fdc from previous row, 1dc into next fdc, work 5ch, skip 5 fdc, 1dc into next fdc, skip 2 fdc, 5tr into next fdc forming next shell, repeat from *. End last repeat with 3tr into the last fdc. Turn.

Row 2 - 1ch, 1dc into first stitch (last tr from previous row). *5ch, 1dc into next 5ch space, 5ch, 1dc into 3rd tr on next 5tr shell, repeat from *. End last repeat with 1dc into the top of the turning chain of the previous row. Turn.

Row 3 - *5ch, 1dc into next 5ch space, 5tr into next dc to form a shell, 1dc into next 5ch space, repeat from *. End last repeat with 2ch, 1tr into last dc, skip turning chain. Turn.

Row 4 - 1ch, 1dc into first stitch (last dc from previous row). *5ch, 1dc into 3rd tr on next 5tr shell,  5ch, 1dc into next 5ch space, repeat from * to end. Turn.

Row 5 - 3ch, 2tr into the same stitch to form half a shell. *1dc into next 5ch space, 5ch, 1dc into next 5ch space, 5tr into next dc forming a 5tr shell, repeat from *. End last repeat with 3tr into the last dc, skip turning chain. Turn.

Repeat rows 2 - 5 until the piece is big enough.

Border
Once the main panel was complete I decided to start on a border. Not having much thread left, I couldn’t make it too elaborate so decided on a simple feather and shell trim. I sketched it out on a piece of paper, stacking 5tr shells which are then extended to widen the ‘feather’ at the top with a picot edge to finish.

I didn’t break the thread, but continued straight from the main panel to the border by reaching the end of  row 5, adding a corner chain, then repeating the 3tr half shell around the corner. Row 5 of the last repeat on the main panel became the start of Row 1 of the border as I was now working in the round.
Close up of a corner.
I would normally work a row of dc around a piece to form a good foundation for any border, but with thread running out I decided against it. The first row of the border starts out very like rows 3 or 5 of the main panel, so I simply placed the 5tr shells and anchoring dcs where it seemed appropriate.

Row 1 - continue straight on from row 5 of the main panel, working in the round and turning the corner by 2ch. 3tr into the same stitch forming another half shell (corner turned). Continue as for Row 5 of the main panel around the sides of the shawl. At the corners, turn with 3tr, 2ch, 3tr in the same stitch. When you reach the beginning of the last row of the main panel, end row with 3tr, 1ch and join to the top of 3rd or top turning chain with 1dc. This last dc will place you in the middle of the equivalent to a 2ch space.

Row 2 - 1ch, 1dc into same 2ch space. 2ch, 5tr into next tr. *2ch, 1dc into 5ch space, 2ch, 5tr into 3rd tr of next shell. Repeat from * to next corner. At corner 5tr into the 3rd tr of the half shell from the previous row, 2ch, dc into 2ch space, 2ch, 5tr into next tr. Corner turned. Continue working pattern between *s, treating each corner in a similar manner. At the end of the row, end with 2ch and ss into the first dc.

Row 3 - 1ch, 1dc in top of joining dc. *2ch, 5tr into 3rd tr of next shell, 2ch, 1dc into next dc, repeat from * until end. Corners should now be set up to be treated as for the rest of the row. At the end of the row, 2ch and ss into first dc.

Row 4 - 1ch, 1dc in top of the same dc, *2ch, 1tr in 2nd tr of next shell, 5tr in next tr (3rd tr of the shell), 1tr in next tr, 2ch, 1dc into next dc, repeat from * until end. At the end of the row, end with 2ch and ss into the first dc.

Row 5 - 1ch, 1dc in top of the same dc, *2ch, skip 1tr, 1tr in each of the next 2 tr, 5tr into the next tr, 1tr in each of the next 2 tr, 2ch, 1dc into the next dc, repeat from * until end. At the end of the row, end with 2ch and ss into the first dc.

Row 6 - Follows on from the pattern laid down in rows 4 and 5, but adds a picot-4 to each alternate tr as it is worked. i.e. 1ch, 1dc in top of the same dc, *2ch, skip 1tr, (1tr, picot-4) into next tr, 1tr in next tr,(1tr, picot-4) into next tr, work 5tr into next tr adding a picot-4 to the 2nd and 4th tr, (1tr, picot-4) into next tr, 1tr in next tr, (1tr, picot-4) into next tr. 2ch, 1dc into next dc. Repeat from * until end.

Join final round with a slip stitch into the first dc, break thread leaving the tail long and pull through.
Blocking.
Block lightly and the weave in the ends before clipping them.

Sunday, 10 April 2016

A hat hack

With a change in the season and hopeful of seeing sunshine, we've dug out M's new summer hats. Being a year older, means the hats from last year are too small but the replacement hats are still too big and prone to blowing off in a slight breeze.

This is not a trait that endears sun hats to M, so we had to fix it.

After much discussion and research on the internet to show M what I had in mind, we settled on the idea of adding a chin cord with a button to slide up and down.

I got out some sample lucet cord, showing M how threading it through a button would allow it to slide but grip. I found suitable ribbon and buttons (much to M's disappointment as she was hoping to visit the local yarn shop), but couldn't find my normal lucet to make the cord. I ended up having to use a fall back lucet from my collection, which is not as comfortable in my hand as the one I prefer. It took a while to get a reasonable tension...
Lucet cord starting to take shape.
Lucets are very portable, so I was able to work the cord up quickly, even taking it to Ikea much to the consternation of another customer who thought I had a catapault!

A day or so later I cut ribbon and sewed it in place on each side of the hat brim's underside to form loops. I threaded a suitable button onto the cord and tied it in place.
One cord, button and some ribbon later...
And there you go, a new adjustable chin strap on a fisherman's style hat. M gave it a test today and try as it might, the wind couldn't blow it off. M approves.
We have a chin cord.
I just need to add similar cords to her other sun hats now!

Saturday, 26 March 2016

Easter alpacas

It is Easter weekend and the local alpaca farm (Toft Alpaca) hosted their usual farm open day today. We introduced M to alpacas during a similar open day the Easter before she turned four, where she became hooked. I don't think we've missed a Toft open day since!

The weather today was awful, starting out grey, drizzling by the time we left he house and gradually worsening to torrential rain by the time we drove home. The addition of a strong wind meant there was no warmth at all, and I suspect this is the reason the farm was quieter than it has been on previous Easter open days. It was still busy, but not heaving with bodies the way it was last time and there was plenty of room to park and the staff were not so stressed due to too many people on a small farm.
Alpaca girls outside the studio.
We decided to join the noon farm tour and while we waited, M explored the site. She loves the pond, examined the daffodils and discovered a huge monkey puzzle tree. The latter is to the side of the studio building and neither Dave nor I have seen such a big example of this curious plant. M couldn't stop looking at it, it was just so odd compared to trees she is familiar with. We looked the rings of scars from previous branches, the way the branches were formed, the leaf structure and speculated as to whether monkeys would live in such a tree.
M with a fallen branch from the monkey puzzle tree.
M picked up a fallen branch and was very taken with it, but we didn't have time to put it in the car as we needed to join the farm tour.

We joined a large crowd braving the weather for a tour by one of the farm's owners, learning a fair bit about alpacas as we went. I'm not sure how much of the talk M listened to, but we trekked up and down steep hills, went into fields with alpacas and tried to avoid the poo!
A herd of ladies.
We made it back to the area outside the studio in time to join the Easter Egg Hunt. In previous years, the hunt has been around the pond, but (last year in particular) the number of children made the terrain dangerous and the hunt was over within a few minutes. This year, they decided to hide the eggs in a small section of managed woodland. We all lined up and waited for the rope to be dropped, then M started to look for eggs. Dave accompanied her at first, then I took over as we had a final sweep for any eggs the others might have missed. M came away with eleven little eggs, which made her happy.

By now the weather was bad and we were cold, so it was time to retreat to the car to eat lunch. Not our favoured option, but we couldn't picnic outside so we made the best of the situation.

For M, the draw of Toft is the chance to walk an alpaca on a halter. Every time we go, she picks out the feistiest animal and off we go. After eating we made our way to the paddock where the farm sets up a small obstacle course to lead the alpacas around. M watched the previous group for a while before declaring she wanted the black alpaca.

For the avoidance of doubt, M informed the man in charge of her choice before we had made it through the gate.
M and Dave with M's chosen alpaca.
This curious chap was watching us as we walked alpacas.
We walked our alpaca, who was reluctant to keep going, round and round and round. I suspect he was fed up with being walked around in circles for no good reason. M was happy, but cold, despite being bundled up against the weather.
We posed, windswept and bedraggled, our alpaca reluctant to be with us.
Our last stop was the cafe for some tea and a chance to warm up. M composed a poem about alpacas and I wrote it down for her.
M's poem, written from the view of the alpaca.
I Am An Alpaca - written by M (age 5)

I am feisty,
Though I am an alpaca,
But I am herd on a lead
And you will know but how to
Lead me on a lead for I am a alpaca. Alpaca. Alpaca.

M illustrated the poem and traced over my writing with a blue pencil, then showed the poem to the lady who took us on the farm tour. She was told it was very good, then skipped off to run around outside.

We finally headed home with a happy M, just as the rain started in earnest. Good timing on our part!

Useful Links:

Monday, 22 February 2016

Yellow, or maybe blue

Saturday I placed my last stitch on the cat scarf I've been making for M, meaning I'm very close to the end of what seems to be an epic project as the scarf has been on my hook since Christmas Day. Even as I considered sewing up and finishing, my mind turned to the next project, namely a cardigan for M. If the scarf hadn't taken so long, I had intended to make another winter cardigan, but with spring upon us I've changed my mind. M needs a summer cardi (or maybe two) that she can live in through the cooler days and use to protect herself from the sun on warmer days.

M agreed and declared she wanted a yellow cardigan, or maybe a blue one. The only problem was, I don't have much in the way of cotton or bamboo, let alone in yellow or blue. If buying yarn, really I needed a pattern first, which presented another issue. M is five and at the top end of desirable target for knitwear designers. There are lots of patterns for babies, but the number dwindles as children get older. I have some patterns for older children, picked up a year ago, but not an abundant supply.

Saturday is a busy day for us, with a lunchtime dance class carving out a huge chunk of the day, meaning we weren't free to hit the shops until after 4pm. By this time my favoured Local Yarn Shop was closed, so we went to Hobbycraft instead.

Unsurprisingly, I did not find the pattern book I was looking for. Neither did I find suitable yarn at a price that I was willing to pay.

We did however find buttons, which M insisted I should buy in readiness for her cardigan. Blue buttons. Lots of them.

We also found card stock, so I replenished my craft supplies.

I also found some booklets on drawing cats and horses, so I picked those up as well.

Hobbycraft were selling off their 'paint your own' money boxes at half price. M wasn't too interested in these until she spotted a Beetle Car...
M couldn't resist this paint your own money box.
It had to be bought, brought home beeping in my bag and painted immediately!

After which, M had to play with these dress up stickers, on sale for half price. Apparently, the children were feeling cold.
And dress up stickers.
This demonstrates why M and I should never visit a craft store of any kind together. We just can't help ourselves!

As for the yarn and pattern. I decided to do my best with the patterns I've got... And placed an order for blue cotton from Wool Warehouse.
Blue.
M is happy.

Monday, 15 February 2016

Valentines or Halloween madness

Sunday was Valentine's Day, which started with M rolling out of bed and deciding she had to make another card for me. We had plans to go out, but I didn't mind too much as it allowed me to check the weather forecast while a small person crafted.
Last minute Valentine's Card for Mummy.
Once M was satisfied, cards were exchanged, chocolates were sampled and we were ready to face the day.

Valentine's Day for us involved a trip to Stratford to meet up with friends from Devon. The day was bright, but very cold and we'd decided to visit the MAD Museum. MAD is of course an acronym for Mechanical Art and Design, which meant lots of automata, very complex marble runs and interactive art installations.

Finding the museum took a short while as it is tucked away above another shop, meaning we had to look up. We're not regular visitors to Stratford, indeed the last time I wandered around the town centre was before M was born, which meant we were taking in a new place with many, many fascinating shops. Very distracting shops!

The MAD museum is accessed via very steep stairs, surrounded by a big marble run installation of rolling golf balls inside tubing around the stairwell. There was a lift to take the balls up to the top again, keeping the system going and providing a fascinating entrance way. We stood there, blocking the stairs, for at least five minutes as M watched, working out how the arrangement was put together.

Finally, we made it up the stairs, paid, were given a brief safety talk (press buttons, but do not put your fingers inside the machines) and we were inside.
M takes a turn on a musical typewriter, connected to glasses via piano wires.
Oh my gosh, there were so many marble runs, constructed out of all manner of things. Some out of wire, others from pipes, some from wood, and even household objects such as kitchen implements. Balls were rolled, lifted, bounced and flung, in never ending cycles, triggered by the press of a button. All three of us were hooked.
A 'flying' machine thing.
The museum were holding a competition to design a MAD machine of your own. They will apparently pick one and build it, so M was keen to draw something to submit. After a few inspirational drawings, M came up with a 'Ball Looper', which had a corkscrew lift and a fan blowing the balls into a funnel, after which they travelled down a tube and back to the bottom of the lift. No pics I'm afraid, as I forgot!
M plays with an interactive art installation.
We were in there well over an hour, which for a tiny museum is not too bad at all.

Once we emerged, we ran the gauntlet of shops (I think we need to come back for a proper wander when it is a little warmer) before walking to the rec ground and play equipment. It was bitterly cold, but small people had energy to burn off. There we stayed until the fading light and rapidly dropping temperature, made us hustle back into town for a hot drink at our friends' hotel before going home.

We looked at the artwork in the lounge, studied a collage of jesters with Jack'O'Lanterns entertaining a Tudor banquet, which led to me retelling the tale of Stingy Jack. This was a story that has several versions, but has its roots in folklore, giving the origins of the Hallowe'en tradition of making Jack'O'Lanterns. My tale started with the fact that while the artist may have shown the lantern made from a pumpkin, traditionally the lanterns were made from turnips or swedes. Pumpkins only came later with the discovery of the New World.

I've linked to a version of the Legend of Stingy Jack from Wikipedia, but be aware there are several different versions of the story. The version I told was similar to the one we heard at Mary Arden's Farm last Hallowe'en, but I simplified it to take into account two very tired small people.

Namely:

Monday, 25 January 2016

Wassailing we did go

Yesterday was a late start, even by our standards, due to us all sleeping in. The cats, who are normally our fuzzy alarm clocks, failed to wake us and so we didn't stumble downstairs until nearly 9am!

Fortunately, we had nothing planned so this wasn't a problem, until Dave decided (at 11am) that we should visit Brandon Marsh. With no other fixed ideas for the day, we slowly mustered and off we went.

The first inkling we had that an event was on, came as we drove into the car park. Signs indicated the overflow car park was open and as we made our way down the driveway, cars were everywhere. After creeping slowly, carefully around the crowded car park and back up the drive, we duly parked next door as Dave remarked he could hear drumming. We pondered if there were Morris dancers on site, noting it was late for a Wassail as they normally happen in early January.

Once inside, the music, shouting and jingling of bells confirmed that yes indeed, we had accidentally walked in on a Wassail.

Naturally, we made the most of it!
Morris dancing may traditionally be the preserve of men, but these days troupes include women.
For the next hour we watched the seven troupes present dance, one after another.
Lots of women, including at least two women only troupes.
I loved these guys' hats.
At the appointed time, i.e. when they had done, we made our way to the orchard to Wassail the trees. This year M decided to join in.
M gets to grips with Sticking.
Daddy decides to stand back.
Arming and Siding are familiar dance moves from our regular visits to Mary Arden's Farm. Sticking was a new experience for M. Handing a 5 year old a stick and telling her to whack your stick is not without it's dangers, but Dave managed to avoid injury!

We danced, we sang. We dipped toast in cider.
An offering to the apple trees - toast dipped in cider.
Toast was hung on trees.
Lots of toast was hung on trees.
Dave and I had an obligatory sip of cider in the trees' honour. One sip was quite enough, raw, proper cider is not to our taste.

Festivities over, we continued with our planned walk.
Puddles and lots of mud.
Music, dancing, puddles and mud. A perfect way to spend a grey Sunday.