Yesterday, it being a bank holiday weekend, we decided to visit the zoo. The only real zoo I've visited in the past has been Paignton Zoo, although as I pointed out to Dave, Plymouth used to have a little zoo when I was a small child. I remember it vaguely and believe it later became a skateboard park!
Our local zoo is Twycross and according to Richard (who came along too) they'd had a recent arrival in the form a new baby elephant. Not being at all sure where Twycross is (my local geography is still terrible), Richard drove and I did the picnic.
The first thing we saw or rather heard as we were queuing up to get in, was the gibbons. I don't have any photo's of them as they were not being particularly obliging, but boy oh boy were they loud!
While were trying to see what all the fuss was about in the gibbon enclosure, I noticed a ruckus ongoing in a nearby paddock, where a rather large cameloid appeared to be trying to climb over a fence while sounding rather angry. Dave looked over and said 'Oh they've got alpaca'... Which is close, but not quite.
This is a guanaco having a set to of some sort of with a vicuna in the neighbouring paddock. The guanaco was the larger and noisier of the two, but the vicuna seemed to be trying to get at the guanaco, so I'm fairly sure this was a two sided argumment.
Meanwhile, the families of the two antagonists got on with the important things which mostly involved sitting around. The guanaco and vicuna being from the same region of South America and the vicuna is a wild cousin/ancestor of the domestic alpaca. Both the guanaco and vicuna are apparently valued for their fleece.
Next door to the guanaco and vicuna were the prairie dogs, which were very sweet and very reminiscent of the equally sweet meerkats. So began a long day of walking around and taking lots of photographs, many of which didn't come out well because of the reflective properties of glass.
Twycross's main thing seems to be primates of which there were many. Those that caught my eye being the orangutan...
This chimp...
And the bonobo...
Looking at the higher apes made me feel rather sad that they were locked up in cages. But what really got to me was the insensitivity and ignorance of some of my fellow members of the public who were staring at them. Despite signs saying "Quiet please" and "Don't bang on the glass, it will frighten me" I saw many people, mostly women with children, doing exactly that, shouting and generally trying to make the animals do something more interesting. And one memorable overheard conversation in one of the Chimp enclosures started...
- "Look mum, chimpanzees!"
- "No... They're MONKEYS." his mother wrongly corrected him, despite the fact that they were clearly chimps.
I'm going to leave you with two of my favourite photographs from the day...
Firstly this baby meerkat which was playing with one of the "ANIMALS BITE" sign that warned caution against those parents lowering or dangling their children over the wall of the enclosure.
And then this one, of a baby emperor tamarin asleep on its mum's (I assume) shoulders. I must have taken about 20 shots of this pair and this is the only one that came out well!
Sunday, 30 August 2009
Friday, 28 August 2009
A productive day off...
I've ended this week with a couple of days off from work, using up time I'd otherwise lose. I hadn't got any particular plans, other than carry out an errand or two, do housework and maybe do something crafty...
So, with a brief break in the weather yesterday I decided to turn my back step into a fleece laundry, trying to make some headway in processing the fleece I was gifted at the beginning of the month.
The tools required. A old washing up bowl to wash the fleece in. A mesh laundry bag, designed for washing your delicates but very good at keeping the locks together. An old roasting dish which is somewhere to put the wet (and very hot fleece) while refilling the washing up bowl. A wooden spoon for gently pressing the fleece into the water, as recently boiled water will scald if it touches skin.
Not in shot, the kettle, my detergent of choice (washing up liquid), vinegar and rubber gloves.
I've modified my technique slightly and have done away with all notion of cooling the water, going instead with completely unadulterated boiled water from the kettle. I've decided that this fleece is so greasy it needs it! I'm also being very, very generous with the detergent. So generous that I'm lucky to get three lots of fleece washed with one bottle.
I've also looked around for suitable drying racks, something portable that will lift the fleece off the floor and allow good air circulation. I was trying to get hold of a sweater dryer but have been having problems, so in the end I picked up some cupboard shelves from Wilkinsons. They're doing the job nicely.
Naturally, while I was engaged in being productive, the cats helped.
Missy demonstrated what fluff should look like...
And Charlie guarded the drying fleece from potential marauding squirrels from under the lavender bush.
I'm getting through the fleece at a good rate now and think that I'll be done with the first one after a few more afternoons spent washing it. I really want to see if the fleece is worth the effort I've put in so far before getting started on washing the second one, so this week I've ordered hand carders from Winghams. Hopefully I shall soon be in a position to spin up a test skein!
Monday, 24 August 2009
Little pieces of lace...
So... Last weekend we had an AscendancyLRP event at Unstone Grange, where I played several NPCs and largely avoided combat where I could. Richard has already done a write up, including some photo's of me, with more photo's on the website here. I was horribly tired most of the event and really worn out most of last week, hence the lack of an update here. What brain power I had left, I reserved for work!
I was very relieved when RichS's tip about breaking out the Clearisil to remove green makeup proved to be true, as I'd made myself up for one NPC and spent the rest of the weekend wearing a faintly green beard that no amount of wetwipes would completely eradicate! Alas, no photographs of the NPC but please take my word for it that she looked very impressive.
This weekend we had nothing planned, which was good considering we'd had two events back to back!
I got to horrify Dave by mentioning the 'C' word and procuring a magazine covered in baubles and packed with patterns for angels, snowflakes, Rudolf, snowmen, etc...
This is an American publication that I found in the one newsagent (Hamilton News) in town that sells such things, while hunting for the elusive Vogue Knitting (or Designer Knitting as it is apparently renamed for the European Market). Admittedly, Crochet World is neither Vogue or knitting, but the contents caught my eye and seem to be nothing but patterns with very little editorial content.
Apart from the sight of Christmas decorations in August, the reason this magazine caught my attention was the sight of a few doily patterns, because I'm on a bit of a doily kick right now.
Despite having been crocheting since I was a child, I've never actually made a doily, with my efforts initially being focused on more practical things such as blankets. But just recently, thanks to the extensive pattern library on Ravelry, I began to see the possibility of doilies. I've become intrigued by these little pieces of lace and have started wondering about how they'd look if I used proper yarn rather than thread with much bigger hooks?
Never having made a doily before and having quite a bit of cotton thread in my stash, I thought I'd give it a go. I trawled Ravelry looking for a free and preferably old pattern that might suit this initial foray into the art of little lace coasters before settling on the Between Meals Centrepiece (Ravelry Link). This is an old pattern, circa 1917 and I originally downloaded this from Annie's Attic, but it doesn't seem to be hosted there any more and I can't find where it's moved to... I did discover some very pretty alternatives though at Free Crochet.
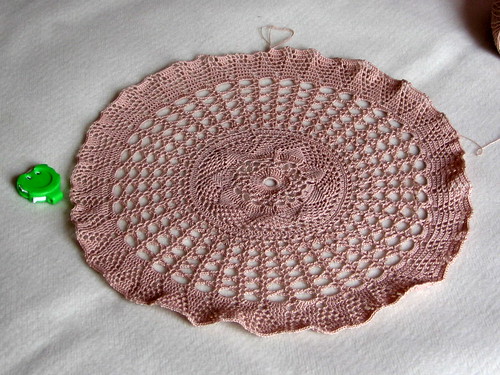
This is no ordinary doily. It is a huge doily which should measure around 30 inches (or 75 cm) across by the time I'm done! A few weeks ago, it looked like this...
While this weekend, after 35 rounds of stiches and with another 25 to go, it looks like this...
I've included the row counter to give some idea of scale, although I haven't measured the doily as of yet. I'm expecting the stitches to open up a little when I get around to blocking it, but otherwise I'm very pleased with my progress so far. It's slow but definitely getting there!
Sunday, 9 August 2009
Walk like an Egyptian...
After a washout of a week, this weekend we've actually had glorious weather, which was fortunate as yesterday we headed up to Shining Cliffs (also affectionately known as Shining Death) in Derbyshire for a spot of LRP. This was a closed AscendancyLRP player event and someone's birthday bash, so I'm hoping they enjoyed it.
I wrote most of this one, so had a fair understanding of what was going on and had a couple of enjoyable moments. I got to shout at the birthday boy and set him up to embrace a nightmare, so I think I did my bit. I'm sure Richard will do a writeup and post some pictures when he gets a moment.
Today we stayed at home and did lots of things that we didn't get a chance to do yesterday because we were running around the woods being scary. This mostly involved housework, laundry, ironing, more fleece washing and this...
I actually dusted off my sewing machine and made costume.
This is a kalasiris, or an Egyptian style robe inspired by the one in Patterns for Theatrical Costumes, which incidentally is a great book and one I highly recommend - providing you have some dressmaking or costuming experience and know how to construct your own patterns. It is a brilliant resource but doesn't hold your hand, do much in the way of instructions and assumes that all you need is the basic shapes and can pretty much do everything else for yourself.
Anyway, I was after a simple robe that could be worn in a variety of ways and would stand me in good stead for crewing. I went stash diving and found this piece of linen which I'd purchased back when I started sewing. It's one of those lengths of fabric which I fell in love with (it was the colour), went "oooh linen" and it fell into my shopping basket. I feel good about making this costume as it was using up stash fabric and I only added thread and ribbon.
Last weekend, I washed the linen and spent a whole afternoon ironing it (while also washing fleece) and then I drafted out my pattern.
I cut, edged and sewed the main seams through the week, leaving today for the finishing touches - namely adding trim and making a belt. This is the first time I've sewn ribbon on with a sewing machine as I normally hand finish everything. The lack of time available meant that this time I decided to have a go at using the machine and I don't think I made too bad a job of it. It was however very fiddly and while faster, I think sewing ribbon on with a machine is a lot harder than doing it by hand!
Naturally, any Egyptian outfit needs a cat in shot and Missy was determined to get in on the action. In fact, there was no shifting her so I think I can say that this robe has Missy's seal of approval.
The robe itself is a very simple garment. In its most basic form, a kalasiris is nothing more than a big rectangle of fabric with a hole cut in it for the head. The sides are then sewn closed with holes left for the arms. The whole thing is pinned or belted in place to form a sort of dress and can be worn on its own or with an underdress of some sort (i.e. a tunic or shift would do it).
In this case, I'm sporting it over a t-shirt and modern skirt but hopefully you get the idea.
Modifications on the basic idea... I decided to add in a back seam and cut at the shoulder seams. This was for ease of cutting and drafting since I was handling smaller pieces of linen. The linen in question creased if I looked at it funny and anything that helped me to keep it flat while I drafted and cut was a good thing.
I decided to split my kalasiris up the front to give me more future flexibility in how I might use this costume. Then I decided that ribbon was needed at the neck and sides to make the whole thing gel properly, so the whole thing look like a proper garment rather than a big piece of linen. The ribbon, in red and gold as a good match and I'm pleased with how it looks now its in place.
The final mod to the basic idea was to curve the sleeves or sides slightly as they fell towards the hem. This was mostly so that if it ever gets worn open, they don't drag on the floor quite so badly!
Overall, I'm pleased with this one and hope to get lots of use out of it.
Wednesday, 5 August 2009
Sweet Tea - crocheted top
Technology is a wonderful thing and keeps me employed, but sometimes things can go a bit haywire, especially when trying to link one type of site to another. I linked my Twitter feed into this site as a bit of an experiment, but then decided to stop my feed being public because some seriously weird people started following me. I'm all for a bit of cyber stalking and read blogs of folks I've never met, but I couldn't see why some of these people would be interested in my tweets and Twitter had recorded them as suspect, so...
Anyhow, since the API here was asking visitors to login to Twitter, I decided the best thing to do was remove it from the sidebar. Sorry if that caught anyone out.
Now, to the business at hand. I have actually finished a project!
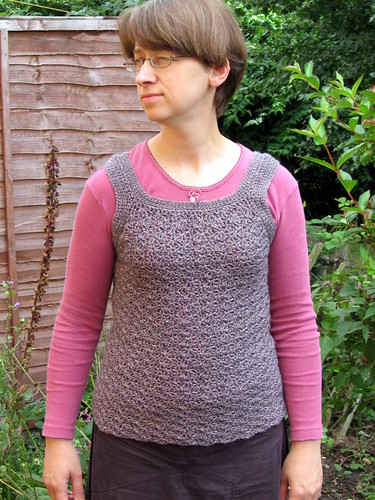
I give you my first ever proper crochet garment and one that actually fits to boot...
This is Sweet Tea, a tanktop (or vest as the designer calls it) from Doris Chan's Everyday Crochet. I made it in a wool mix DK called Life DK from Stylecraft, the colour is Nutmeg Marl which worked up darker and more grey than I thought it would, but I like it.
It's sombre and sensible and although I've never been much of a tanktop wearer, I'm hoping that I can persuade myself to wear it as office wear once autumn hits (rather than the wet, warm and humid summer we're currently enjoying).
Being a tight crocheter, I had trouble hitting gauge, so I ended up working on the smallest size (32 inches across the chest) but on the next hook size up, so going from 4.5cm to 5cm for the main piece. I worked the straps with a 4mm hook as specified in the pattern.
Miraculously, however, once washed and dried and measured lying flat, this top came out at 39cm across the chest, so that's going to be a little under (as in maybe 1 cm) 32 inches all round. So maybe I wasn't as far off gauge as I thought I was.
The result is a piece that I'm hoping has just enough negative ease to be flattering, but can be worn over t-shirts or an office blouse as a suitable layer. It certainly seemed to fit when I tried it on!
I did have a few problems getting started on this one as I had difficulties understanding the pattern. Not to say it wasn't well written, but I had problems getting my head around the designer's approach to and style of writing. Fortunately, there is a group on Ravelry where this top has been discussed extensively and I found the answers which made things a whole lot clearer. The pattern wasn't wrong, I just wasn't reading it right!
Oh and much kudos to Doris Chan, she was right in there with the crocheters working from her book, giving support, answering questions and clarifying any points that weren't as clear as they could have been in the pattern. I've seen some designers be very snooty to people stuck on their patterns, but not this lady, she was very helpful.
I made a couple of modifications, besides changing the hook size.
This tanktop is crocheted top down, starting with two identical front/back pieces that are joined under the arms, before crocheting in the round to work down the body. After reading comments on the aforementioned Ravelry forum, I decided to attach the straps immediately after joining the front and back, so that I could try the piece on as I worked it.
That decision made, I lengthened the straps, crocheting 30 BASE CH/SC (or 30 BASE CH/DC if you're British like me) so that my tighter stitches didn't cut off the circulation to my arms.
And finally, I continued the body until I had 33 rows or 41cm from under the arm to hem, before binding off.
All in all, once I got over the pattern reading issues and my sudden inability to count which plagued me when I started this project, I liked how it turned out. The crochet worked up very quickly and was fun to make, problems and frequent re-crocheting included. I also learned a lot from this one, followed a crochet pattern all the way through and I'm hoping gained a new staple for my wardrobe.
Monday, 3 August 2009
My first encounter with raw fleece
After spending last weekend camped out at work, I had a great deal to get through this weekend, mostly in the form of chores. Saturday we did most of the housework that had been waiting for attention and took rubble from when the fireplace was enlarged to the tip. It had been sitting in rubble sacks in the shed since early June but this is really the first opportunity I've had to get rid of it.
While we were out, we stopped by Hobbycraft in Coventry because I was looking for some ribbon for a costume I have in mind.
I drifted around the ribbon aisle for a while inspecting many spools before finally settling on one red and gold ribbon which I'm hoping will compliment the cherry red linen I intend to match it to. Then I stepped around the corner into the next aisle to discover that Hobbycraft have a yarn sale on. Lots of yarns were reduced to half price and some had been reduced again to a third of their original price... These were wools we're talking about and ones I'd admired before - so naturally I picked up, er, eighteen assorted balls at 95p each.
My wool acquisition did not stop there.
Last Friday, just before the upgrade work that meant I had to stay in the office most of the weekend, a colleague gave me two bags of freshly shorn fleece. The lady in question has a smallholding and had offered me fleece from her small flock of Shetlands in the past and holding to her promise, brought in two of the best of this years sheering.
As she explained, unfortunately the heatwave at the beginning of June followed by the wet weather in July hadn't been kind to her sheeps' fleece, with some of them starting to lose it naturally. These were the ones that had looked most promising when they came off the sheep.
Unable to do anything with them last weekend, I took them home and put them in the shed, determined to have a go at cleaning a small sample as soon as possible.
Saturday afternoon, with the household chores and errands out of the way and heavy monsoon like rain pouring out of the sky, I decided to have a go. I'd googled and consulted my book (Start Spinning by Maggie Casey) which agreed with what I'd read on the interweb, so I was ready to go. Armed with rubber gloves and a laundry bag (the kind you use to protect delicates in the washing machine) I braved the torrential downpour and headed for the shed.
When I unwrapped the first fleece, I was in for a shock. I've seen how sheep live of course and I've seen raw fleece before, but this wasn't trimmed or skirted. It was raw in the truest sense of the word. The side that had been cut away from the sheep all soft and silky, but the locks were densely packed and full of grease, so that the outside looked squished and discoloured. The smell was the worst thing I think; coming from gentle odour of dirty sheep, huge amounts of lanolin and the liberal amount of dung attached to the wool that would have been around the sheep's hind quarters. I just hadn't realised how disgustingly filthy sheep are!
Suffice it to say that I waded in with gloved hands and pulled off the worse of the soiled fleece and discarded it. Then I pulled a small amount of wool off the fleece - which wasn't easy, the stuff didn't want to come away - and put it in the laundry bag before taking it up to the house where hot water awaited.
Having googled and read, I'd decided to use very, very hot water to scour the fleece and I think I made the right decision. By hot, I mean three boiled kettles worth hot with just a splash of cold. I added a liberal amount of normal dishwashing detergent so the water was green and greasy looking, then lay the bag of fleece on the top. I used an old wooden spoon to push it gently into the water and then left it alone for 20 minutes.
After 20 minutes, I repeated this wash stage, waiting another 20 minutes before throwing the water away. Next I began a rinse cycle, again with boiled water, a little cold and this time a dash of vinegar, which according to the book and interweb is supposed to counteract the alkaline detergent and bring the fleece back to life. 20 minutes later and I rinsed in clean water, same temperature as before...
Here it is during the final rinse, looking very much cleaner than it started out!
For the final stage, given that it was pouring with rain I decided to spin the fleece in the washing machine, setting it for a relatively gentle 700rpm. As I laid it out to dry, I was half expecting felt but although it did look compressed as it came out of the bag, it didn't have the compactness of felt. I left it alone to dry.
Next morning, with the sun out, I put the fleece out on the step to dry...
I also got the second fleece out of the shed and trimmed off the worst of the soiled wool as I'd done for the first. I got the first fleece out to compare it in its raw state to the stuff sitting on the back step and the comparison was stark. Even Dave commented how different it looked.
A close up of the fibres...
Washed, it smells slightly of washing up liquid and wool (as it should), but no dirty sheep smell. It isn't sticky and it will pull apart easily (unlike the original) and I am happy to handle it. There is still some dirt in there but compared to before, it is pristine. I can see some bits of grease or something in the fibre and I'm hoping they'll comb out when I come to carding it.
Having washed my first bit of raw fleece, I'm stunned by the suggestion in the book that I could spin it straight from the sheep (spinning in the grease). I just don't see how anyone could draft raw fleece easily, apart from the smell, the grease and the dirt, it was matted and sticky, meaning it wouldn't pull apart as the fibres just wouldn't slide past each other. If it had somehow been draftable, I hate to think what state my wheel would have been in after spinning it!
Subscribe to:
Posts (Atom)