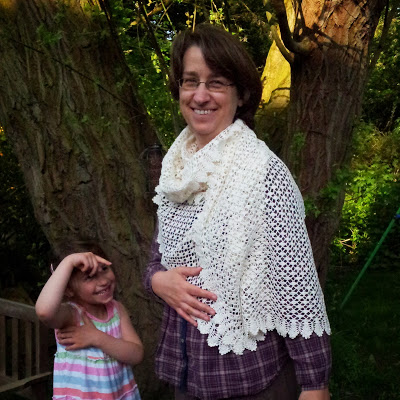
I finished this shawl over 18 months ago, put aside to block and completely forgot about it. I finally remembered it a couple of weeks ago, meaning I've been sat trying to remember what I did! Mostly this means studying the shawl, thinking back and being quietly amazed that something I made is this pretty.
|
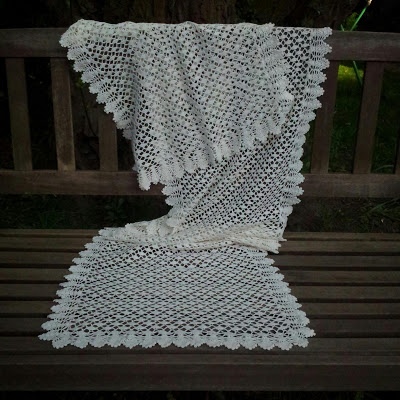
I started this shawl back in August 2013. It was intended as a long term travelling project which I could work on wherever I was, picking it up and putting it down as necessary. These days, time for craft is limited to random snatched moments around everything else, which has drastically impacted on my ability to actually make stuff, remember stitch patterns, maintain even tension or keep things from unravelling.
|
My aim with this project, initially at least, was to make something that wouldn't matter if it wasn't finished. I wanted something to carry around, that would keep my hands busy, wouldn't require me to look at it or pay particular attention to what I was doing and would pack down small.
Lace might seem like an odd choice for this category of project, but if you choose a well behaved cotton thread and keep it clean (which for me meant the project lived in a plastic zip lock bag, inside a cotton bag), it is no different to working anything else. Cotton thread is thin but strong, the hook is tiny and the stitches are teeny but will open up on blocking to reveal their beauty.
I started off by deciding to use stash thread left over from another project. I planned to make a rectangular panel and put a border on it. My thought was to keep going with the rectangle until it was big enough or I ran out of thread. At that point, I’d put either a border or end panels on, using a contrasting thread if the original thread ran out.
I didn't run out of thread, although there was a horrible moment, one row from finishing the border when I thought I was in danger of doing so! Fortunately, I managed to get that row made, otherwise I suspect this shawl would still be sitting in my working heap.
Overall this was an easy crochet. The repeat pattern was both simple to remember and intuitive to follow. The thread was well behaved and travelled well. I worked on it at home, soft-play centres, parks, nature reserves, historical houses and anywhere else that I found myself with a few minutes to spare. There were a few worrisome moments when I lost the teeny tiny hook down the side of the sofa, but otherwise it just kept growing. The main requirement was persistence on my part and the whole thing took approximately fourteen months to complete.
| |||||||||
Final Size
Unblocked - 43cm x 186cm
Lightly blocked - 46cm x 233cm
Yarn
Circulo Clea which is a #10 count sized thread in 100% cotton.
I had some white Clea thread in my stash, leftover from making a gentleman’s nightcap. I’d bought two balls initially, but only used about half a ball on the hat. From past experience, I remembered the Clea to be very soft, but easy to work with. The softness being important as I wanted a wearable shawl, so while I wanted to use a cotton thread I didn’t want something stiff and scratchy in the way of a thread more suited for doilies.
Hook
Worked with a 2mm hook.
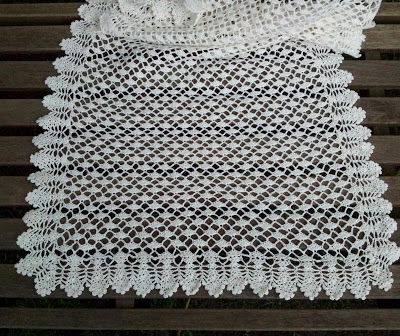
My first stop involved flicking through the many stitch dictionaries I own to find a suitable pretty, not complicated stitch pattern, but with enough going on to keep my interest for months and months and months. I eventually settled on a shell trellis from The Harmony Guides:Basic Crochet Stitches.
I swatched with a 2mm, 2.5 and 3mm hook. Each swatch was washed, blocked and tested for softness. Eventually I settled on the 2mm hook as giving the best result with this thread.
Tension
I didn’t measure gauge or tension, I simply started with the correct multiple of stitches for my pattern and increased until I thought the shawl would be wide enough. The swatches indicated that the finished piece would be be stable in terms of width, only growing a little under blocking but I could expect considerable increase in length as the pattern opened up.
Foundation Row
I personally hate using chain foundations unless absolutely necessary. I find them fiddly, difficult to work the first row into and they can come out at a different tension to the rest of the piece, leading to either puckering or bowing. My preference is for the chainless foundation (or fdc using British notation) which works one stitch at a time, extending the row by placing a single chain in the previous stitch to act as a base for the new stitch. So much easier!
In this case, to support the shell and trellis, I started with a multiple of 12+1 stitches of fdc.
Main Panel
The main panel has a basic shell and chain trellis stitch, taken from one of the Harmony Guides.
This stitch pattern has repeating alternate rows of chain, then 5tr shells with 5ch in between each shell. The shells are worked and anchored at the sides, to the middle chain in the 5ch space of the row below using a dc. I've staggered the shells, rather than stacking them, to give the diamond effect because I thought it was more visually interesting. The chain between the shell rows is anchored with a dc into either the middle ch or tr (as appropriate) of the previous row. I just worked in pattern, putting a half shell (3ch, 2tr) at the beginning/end of the row as needed.

i.e.
Row 1 - 3ch, 2tr into the same stitch to form half a shell. *Skip next 2 fdc from previous row, 1dc into next fdc, work 5ch, skip 5 fdc, 1dc into next fdc, skip 2 fdc, 5tr into next fdc forming next shell, repeat from *. End last repeat with 3tr into the last fdc. Turn.
Row 2 - 1ch, 1dc into first stitch (last tr from previous row). *5ch, 1dc into next 5ch space, 5ch, 1dc into 3rd tr on next 5tr shell, repeat from *. End last repeat with 1dc into the top of the turning chain of the previous row. Turn.
Row 3 - *5ch, 1dc into next 5ch space, 5tr into next dc to form a shell, 1dc into next 5ch space, repeat from *. End last repeat with 2ch, 1tr into last dc, skip turning chain. Turn.
Row 4 - 1ch, 1dc into first stitch (last dc from previous row). *5ch, 1dc into 3rd tr on next 5tr shell, 5ch, 1dc into next 5ch space, repeat from * to end. Turn.
Row 5 - 3ch, 2tr into the same stitch to form half a shell. *1dc into next 5ch space, 5ch, 1dc into next 5ch space, 5tr into next dc forming a 5tr shell, repeat from *. End last repeat with 3tr into the last dc, skip turning chain. Turn.
Repeat rows 2 - 5 until the piece is big enough.
Border
Once the main panel was complete I decided to start on a border. Not having much thread left, I couldn’t make it too elaborate so decided on a simple feather and shell trim. I sketched it out on a piece of paper, stacking 5tr shells which are then extended to widen the ‘feather’ at the top with a picot edge to finish.
I didn’t break the thread, but continued straight from the main panel to the border by reaching the end of row 5, adding a corner chain, then repeating the 3tr half shell around the corner. Row 5 of the last repeat on the main panel became the start of Row 1 of the border as I was now working in the round.

Row 1 - continue straight on from row 5 of the main panel, working in the round and turning the corner by 2ch. 3tr into the same stitch forming another half shell (corner turned). Continue as for Row 5 of the main panel around the sides of the shawl. At the corners, turn with 3tr, 2ch, 3tr in the same stitch. When you reach the beginning of the last row of the main panel, end row with 3tr, 1ch and join to the top of 3rd or top turning chain with 1dc. This last dc will place you in the middle of the equivalent to a 2ch space.
Row 2 - 1ch, 1dc into same 2ch space. 2ch, 5tr into next tr. *2ch, 1dc into 5ch space, 2ch, 5tr into 3rd tr of next shell. Repeat from * to next corner. At corner 5tr into the 3rd tr of the half shell from the previous row, 2ch, dc into 2ch space, 2ch, 5tr into next tr. Corner turned. Continue working pattern between *s, treating each corner in a similar manner. At the end of the row, end with 2ch and ss into the first dc.
Row 3 - 1ch, 1dc in top of joining dc. *2ch, 5tr into 3rd tr of next shell, 2ch, 1dc into next dc, repeat from * until end. Corners should now be set up to be treated as for the rest of the row. At the end of the row, 2ch and ss into first dc.
Row 4 - 1ch, 1dc in top of the same dc, *2ch, 1tr in 2nd tr of next shell, 5tr in next tr (3rd tr of the shell), 1tr in next tr, 2ch, 1dc into next dc, repeat from * until end. At the end of the row, end with 2ch and ss into the first dc.
Row 5 - 1ch, 1dc in top of the same dc, *2ch, skip 1tr, 1tr in each of the next 2 tr, 5tr into the next tr, 1tr in each of the next 2 tr, 2ch, 1dc into the next dc, repeat from * until end. At the end of the row, end with 2ch and ss into the first dc.
Row 6 - Follows on from the pattern laid down in rows 4 and 5, but adds a picot-4 to each alternate tr as it is worked. i.e. 1ch, 1dc in top of the same dc, *2ch, skip 1tr, (1tr, picot-4) into next tr, 1tr in next tr,(1tr, picot-4) into next tr, work 5tr into next tr adding a picot-4 to the 2nd and 4th tr, (1tr, picot-4) into next tr, 1tr in next tr, (1tr, picot-4) into next tr. 2ch, 1dc into next dc. Repeat from * until end.
Join final round with a slip stitch into the first dc, break thread leaving the tail long and pull through.
Block lightly and the weave in the ends before clipping them.
|


