Sunday 30 October 2016

M's Wobbly Scarf

After a mild run up, it seems like autumn is suddenly here. There is a cold bite to the air, trees are dropping their leaves, the cats have started staying indoors, evenings are drawing in and my thoughts have turned to winter knitwear.

I actually spared a thought for the coming winter a few weeks ago when I sorted out M's coats. Being a fast growing girl she needs new coats every year and hanging them up lead to me looking at her scarves. Sadly, M has outgrown the lovely cabled scarf she has been wearing since she was about three. This was a bit of a shocker for me as I don't think of scarves as being something you can grow out of, but she has. If we wrap the scarf in question around her neck twice (as you do) the tails are very short, with no weight to keep the wraps in place let alone keep the draft out of the front of her coat.

I declared it was time to knit a scarf, my first in several years.

After talking to M, she came up with a design...
M's design for the scarf she'd like.
Cables. It has been a long, long time since I attempted cables.

I dug out my copy of the Harmony Guide to Cables & Arans, quickly feeling out of my depth and realising I have no idea how to read a cable chart. This is something I'm going to need to fix in the future, but with winter looming I decided to wing it.

Using M's design as a guide I swatched some simple 2x2 cables, setting them inside some bands of 4 purl, with two single purl columns separating the middle cables. Most of the twists are on the eighth row, with one cable being offset and twisting on the tenth row. I added a 2x2 rib to each side to finish.

I had a go at charting the result myself, but it's not quite up to Harmony Guide standards!

This sounds more complicated than it was, mostly I had to keep track of row counts so I knew which cable I was working. I also had to watch the direction of the twist as M wanted the cable to snake from side to side rather than twisting around.
Work in progress, slow but steadily getting there.
After some thought and in the hope of speeding up the knit, I decided to add a keyhole to this scarf as well as working the yarn double. I wanted the extra loft and to make it easier for M to put on herself as she has problems with repeatedly wrapping a scarf around her neck.
The finished scarf.
Vital info -

  • 6.5mm needles.
  • 38 stitches.
  • Yarn: 200g Mercia Wools Superwash Pure Wool DK (worked double). The colour is Dashing Red.
  • Width: 16cm
  • Final length: 135cm.

Apparently the extra length was a bit scary, but she'll grow into it. Right?
The final result is a little on the long side because I was sizing for a scarf to fit a six to ten year old.
So here we have the final scarf.

Harmony Guide: Cables & Arans - https://www.amazon.co.uk/Cables-Arans-Stitches-Harmony-Guides/dp/159668058X.

Tuesday 6 September 2016

A brief visit to Middle Earth

Saturday we decided to do something different and headed over to Sarehole Mill for the Middle Earth Festival, which was essentially some traders, folks in costume and festivities celebrating all things Tolkien.

Naturally, the weather decided Saturday was the day to rain and rain and rain and rain. We didn't let that put us off, but it certainly made for a cold, wet day and I suspect prevented a lot of the arena type activities from going ahead. We did see a couple of guys in orc masks and a bit of posturing, but full on skirmishes in torrential rain are never a good idea. Not only would it be uncomfortable, it would be dangerous due to it being very slippery under foot.

Sarehole Mill is in Birminghan, so about 40 minutes away in the car. We found the place without too much trouble, parking in the expected field before walking back to the venue.

Once inside the first marquee, we briefly looked at 'The Mirk Wood' which M didn't like very much, even when we explained the spiders webs were Hallowe'en props. After that, we sheltered under umbrellas as we looked around.

We found a falconer sheltering under a couple of gazebos, accompanied by a young Harris Hawk. The hawk didn't like the rain and was flying within the confines of the gazebo. There were a few owls in his van, but there they stayed only coming out briefly toward the end of the day when the weather let up a little. Owls do not fly in rain.
M with a Harris Hawk.
After looking at the orcs we wandered around the various tents, examining wares or craft displays.

The wood carving tent went down well, where M voted for a cat in this year's competition. We looked at the other pieces on display, with a whale proving to be M's favourite. She told its creator so at length, telling him he should make more pieces just like it. The woodcarver turned the whale around, suggesting it could also be an elephant, but M gave him a hard stare. He eventually conceded it was better as a whale.
A wooden whale.
Morris dancers also went down well.
Morris Dancers.

But not this man, who shouted a lot. As part of his patter he approached M with a bag of lollies, at which point she carefully stepped behind me! I declined the offered sweets politely so he moved on, finding lots of other takers for his lollies.
The shouty man.
We spent most of the day looking at the crafts on display. Lots of pretty things were admired and we bought some pretty stones. As I remarked to M and Dave, we really do need to make some jewellery as I have a fair few bits now. M spent some time in the children's tent, colouring and making a wand. We talked to some re-enactors, from whom I learned about a spinning tool for beginners called a 'dizzy sheep' and another one called a 'spurtzleur'. These two tools are apparently mobile and suitable for those who can't get along with a drop spindle, so might be good for teaching children to spin.

M talked to several of the traders about their wares. In one case and to our complete surprise, one stall holder suddenly gifted M with a nightlight. The lady in question was very taken with M who had charmed her with her observations, admiration and general friendliness. She asked M which was her favourite piece on the stall (an Alice In Wonderland nightlight), then gave it to her!

The event closed at 5pm and we headed for the car at about 4:30pm, all of us tired and cold. We did stop off at the shops and Hobbycraft on the way home, but ran out of time so decided to go back on Sunday. I had spotted that Hobbycraft had a sale on, with a lot of art supplies at half price!

Not a bad way to spend a rainy September day.

Tuesday 30 August 2016

An Olympic brolly

In honour of the 2016 Olympic games, M and I have been experimenting with making patterns from interlinked circles. We started out on paper and then moved onto painting another umbrella, taken from what feels like my endless stash of plain umbrellas which are just waiting for some decoration.

The umbrella was a lot smaller this time and only intended for personal use, rather than a huge golf umbrella. Being smaller, it took a lot less time to paint! I mixed up a 50/50 acrylic paint to fabric medium in suitable Olympic colours, i.e. blue, red, yellow, green and black.

For the circles, I cut a dense cardboard tube into smaller pieces. The tube was the kind you find in the middle of aluminium foil or cling film. These are strong and unlikely to disintegrate after being repeatedly dunked in paint.
Paint (acrylic with fabric medium) and cut down cardboard tube.
All set, we retired to the garden with out paints, cardboard tubes and an umbrella.

An hour or so later, we had this umbrella set aside to dry.
The finished Olympic inspired umbrella set aside to dry.
Unfortunately, at this point the wind decided to pick up the umbrella and blow it around the garden. This caused some consternation, not only because of smudges to our newly painted umbrella, but because the laundry was drying on the line!

The umbrella was retrieved, I picked off the worst of the vegetation before standing it to dry in the kitchen for the rest of the day.

Once it was touch dry we signed the umbrella in sharpie, before transferring it to the shed to continue drying for another three days. At that point, I examined it carefully and peeled off any remaining bits of garden before covering each panel in turn with a pressing cloth, then ironing on high to set the colour. Ironing is a mummy only activity.

After ironing, I re-sewed the parasol to the umbrella frame. I'm not sure if it was poor workmanship, or the tumble the brolly took around the garden, but several of the stitches had popped so it needed a bit of repair.

M's favourite part of painting umbrellas is the quality control test at the end, namely testing the umbrella's waterproof properties with a watering can. Personally, I feel that any umbrella which cannot be taken out into the rain for fear of it getting wet, is not much of an umbrella.
Waterproof and the colours don't run.
Thankfully, the Olympic inspired umbrella passed the final test with flying colours.
The finished umbrella.
And the view from the underside.
The artwork on this umbrella was shared equally by myself and M. We both just stamped circles in whatever way we felt like doing, having lots of fun in the process. Again, I think it turned out well and we were both happy with the result.

Sunday 21 August 2016

Phoebe in blue

It's been a busy couple of weeks here as Olympic fever has taken hold of my six year old. This means I've learnt more about the history of the Olympics and watched more sports over the past two weeks than I've probably done in my entire life! Finding time to update a blog between hosting our own toy Olympics has been tough.

I finished a cardigan for M a few weeks back and thought I'd better write it up while I still have access to the computer. It will undoubtedly be co-opted for something sport related in a short while.

The simple Sirdir cardigan which has been my go-to pattern for M over the past couple of years, only runs to age 6-7. I'm considering whether to resize it, but in the meantime I need to branch out and try other patterns. The only thing is, there don't seem to be a huge selection of sweater patterns for little girls. And of those that are available, the field becomes even narrower when considering the child in question's personal taste. Honestly, there is no point spending time knitting a cardigan for a small person if she doesn't like the end result.

After some thought, I eventually settled on Phoebe (Ravelry Link) from Sublime Yarns. This is a simple, close fitting cardigan, with a 'V' neck and contrasting band around the collar, front, hem and cuffs. I decided to knit as close to the pattern as I could, rather than fiddling around and modifying it as I usually do. I was hoping this would make my life easier.

Until of course, I tried to get gauge.

The short version of this story is I couldn't.

I like the Drops yarns from Garnstudio, and having used a dark blue Muskat for M's last cardigan, I'd decided to use the light blue for this one. For contrast I had to choose between turquoise and the left over dark blue from the previous cardigan.
Swatch to consider contrast colours.
After swatching, the dark blue won. It wasn't that I didn't like the turquoise, but it just didn't pop in the same way the darker blue did.

Matching tension proved to be something of a problem.

The pattern for Phoebe requires 10cm = 22 stitches x 28 rows.

The Drops Muskat is a calendered cotton with a high sheen, very pretty and with good stitch definition. It also has an expected gauge of 10cm = 21 stitches x 28 rows.

I'd not been able to match the required tension for the last time I used Muskat, but it hadn't worried me too much. I deliberately loosened the tension, going for a swing type cardigan and making the finished garment bigger. The downside was I went through a lot more yarn than I expected and had to order more to be able to finish the project.

With Phoebe, I wanted to knit as close to gauge as I could and end up with a finished garment sized as described in the pattern.

This proved a problem for me as I could not get the Muskat to knit to the required tension. I had to settle for the expected gauge for the yarn, i.e. 21 stitches, rather than 22 stitches.

My working needle was 3.75mm and 3.25mm where the pattern asked for a smaller needle.

That difference of 1 stitch over every 10cm adds up and in this case would have resulted in an increase of 1.5cm around the chest. Thinking about this retrospectively, that doesn't sound too bad and is certainly able to be absorbed into ease but would have resulted in an inevitable looser fit. After my previous experience with this yarn, I was also worried that I'd knit a lot more yarn than expected and run out, which would raise the issue of matching dye lots.

Some deliberation later, I decided to adjust the cast on numbers for the pattern to match the new expected tension of 10cm = 21 stitches x 28 rows.

i.e.

I made the second size, intended to fit a chest of 61cm, so my cast on stitches became:

Back - Cast on 70 st (instead of 72)
Fronts - Cast on 34 st (instead of 35)
Sleeves - Cast on 42 st (instead of 44)

Naturally this meant adjusting all expected stitch counts throughout.

Other than that, I knitted as directed, matching lengths to pattern directions.
Phoebe in blue.
I deliberately knitted one size up, resulting in a cardigan which is a little too large on the shoulders, but not so big as to look silly.
Sitting reasonably well on the shoulders and across the chest.
For future cardigans I need to remember that M is tall for her age, or at least compared to the children the pattern designer has sized for. Even though I added 1cm to the sleeves and 2cm to the length of the body, as you can see from the photographs, the length is actually spot on for M right now.
The back view, showing the hem at exactly the right length.
I'm a bit disappointed with this. I was hoping to get two years wear out of the cardigan, but now expect it will be too short for her by September next year. Lesson learnt, add a lot more for length on future garments.

It is worth mentioning that I'm not an experienced cardigan knitter. Apart from a baby cardi I made while I was pregnant, I've only knitted one child cardigan pattern before, albeit making it up three times.

In this case, the cardigan was a straight forward knit. There were differences in approach to handling the decreases to my previous experience, but nothing terribly difficult to understand. The fun came when I tried to make the collar.

I've never tried to pick up stitches for a collar before and the results were messy. Very messy. In fact, it was so bad that I ripped the whole thing out and started again. Normally I'd have reached for a crochet hook, adding my own collar and front, but resisted the temptation and instead dug out my copy of Montse Stanley's Knitting Handbook.

This hefty tome is one I think every knitter should have on their shelf. It is a reference work of so many different techniques, with advice on everything, including how to handle picking up stitches for a collar. Following the advice in the book, I picked up the stitches in the main knit colour, which acts as a foundation and masks any irregularity in the stitching. Once the stitches were on the needle, I switched to the required contrast colour to work the rest of the front.
The rolled collar - look carefully and you can see the foundation row in the main colour.
The other area to give me problems was the button holes. I couldn't understand the instructions in the pattern. By now, I was truly fed up with the collar and front, so I did my own thing. I had a quick hunt on YouTube for examples of button holes, which I followed instead of the pattern.
Buttons as chosen by M.
The end result looked OK, were the expected size and in the right place, but were not made in the way directed by the pattern.

Yarn quantities used:

6 x Garnstudio DROPS Muskat 50g - Light Blue.
1 x Garnstudio DROPS Muskat 50g - Blue.

M was pleased with the result and other than it not being as long as I wanted, I think the cardigan came out OK, so overall I'm happy with this.

Useful Links:

Sunday 7 August 2016

Coventry SkyRide

Today was the event we've been preparing for over the past month, The Coventry SkyRide.

Dave cycles on a daily basis, but while I used to cycle to work a few times a week, I haven't done so in a LONG time. M has never ridden a bike, or rather she hadn't done so until last month.

With it having been such a log time since I've been in the saddle, M's complete lack of experience and adding in a new bike plus a tag-along to the mix, it seemed only sensible to practice a little before the big event. This is why we've been heading to the park with the tag-along a few times a week for the past month.

I am so glad we did, as I think we gave a good showing today, completing one full lap and then going around Coventry's Ring Road a second time. We cycled to the event (and home again), so we've spent a long time on the bikes today. I had M behind me on the tag-along, while Dave was cycling his own bike on his own.

We've had a good day. The weather was good with clear skies and a bit of wind, almost ideal really.
Here we are, just before setting off on the SkyRide.
We arrived in good time but hung back at the start as I knew we'd be amongst the slower cyclists.

The tag-along doesn't lend itself to fast cycling. M is also still a bit uncoordinated at pushing off and prone to wobbling at inconvenient moments. The main problem for me today was the tag-along having a huge turning circle, which proved tricky on the first part of the route where we were all crammed in together with too many cyclists in narrow streets with sharp bends. This is nothing like cycling endless loops around the park, where we have paths mostly to ourselves and the option to move onto the grass to avoid other park users.

There was a near miss just before we headed onto the Ring Road, as we were turning a sharp bend, going uphill and into a fierce crosswind I lost control, nearly falling into another cyclist in the crush. I only saved us by jumping off the pedals, forcibly preventing the bike from tipping but twisting my ankle in the process. Fortunately, M was OK and I don't think she realised how close we came to crashing.
M discovers a cycle powered bubble machine.
That aside, after a brief moment to recover we hopped on the bike and made it around the Ring Road with no issues. M was a champ, cycling without complaint and concentrating hard to wobble as little as she could. We didn't crash into anyone. We didn't fall off. We didn't need to stop or walk. We were happy.
M has a go at powering a racing track with pedal power.
We stopped for lunch (and first aid for my poor ankle), then as cycling didn't hurt in the way that walking did, we decided to try the ring road again before it was opened to normal traffic. It was much easier the second time as there were fewer cyclists and we enjoyed ourselves. I even managed to get some relative speed out of the tag-along.

Event complete, a bit weary but happy with our performance, we locked the bikes up so we could pose for the official photograph.
Our official snap at the end of the ride. We all have our eyes closed.
We stopped for a tea/coffee and a biscuit before riding home, via the same park we've been cycling around for the past month. Naturally, we broke the journey so M could have a run around, then pushed on home where ice cream was waiting. How else could we have ended such a brilliant day?

Saturday 6 August 2016

An autumnal umbrella

Following on from the Daddy Umbrella, I found myself with extra umbrellas just waiting for someone to decorate them. In the meantime, M and I are doing a project on trees so I thought we should attempt a craft involving leaves.

Painting by taking prints from leaves or bits of plants is something we've done before and it can be very effective. I found myself wondering if I could print onto an umbrella using leaves.

Lessons learned from the Daddy Umbrella told me that acrylic paint mixed with fabric medium becomes transparent. Multiple layers help, but the umbrella fabric colour is still visible through the paint. This is fine with pale fabric, but a strong colour like black (as on the umbrella I had available to take paint) would mean most colours are likely to be muted and difficult to see. Personally, if I'm going to put in the effort to hand paint an umbrella, I want it to have a bit of visual punch and to stand out from a distance.

One way to overcome this is to lay down a base colour, a foundation onto which you then paint the rest of your masterpiece.

I had my plan. I decided we'd try taking prints in white paint, then fill in the resulting shape to give a white silhouette. Once this was dry, we could paint over the top in autumnal colours to hopefully give the effect of an umbrella covered in fallen leaves.

I explained the plan to M who may have been doubtful, but loves me and so went along with the idea. Last weekend, we collected a few leaves while out on our cycle around the park, then got to work.

M loved painting the leaves white, even if she didn't like having white fingers and kept running off to wash her hands. Together we applied leaf prints, taking a few prints before stopping to paint over the top. I went around the edges, neatening the leaves up and making them more 'leaf shaped' where either the print or M's painting ability had failed a little.

After a couple of hours work, we had this:
Leaf prints, painted over to give white silhouettes.
It was actually very striking and M was so excited, she ran around the garden a few times whooping. When you're a six year old artist, you get to do that sort of thing. I just oohed and ahhed, and was quietly impressed.

The umbrella went into the shed to dry for two days, then we started on the next stage. We added colour.

We worked with a limited palette of green, orange, yellow and red. The brief was to think autumn leaves as they fall from trees, but to only paint over the white. M finds paint difficult to work with, or rather she finds it harder to achieve the results she wants with paint, so this was a bit of a challenge. We talked about holding the brush as she would a pencil, not overloading with paint and steadying the umbrella with your spare hand. I was also ready with a clean finger to remove any excess paint before it had a chance to set into the fabric.

As it was, M painted a whole panel herself plus a few leaves scattered around the umbrella. I painted the rest. It took probably another two hours.

M signed the umbrella using a bronze Sharpie and I dated it, then it went back into the shed to dry.

Three days later, I ironed it using a hot iron and pressing cloth, before revealing the final result to M.
An autumnal umbrella.
We were both impressed. I think the brushwork could do with a bit of practice in terms of technique, but the colours are beautiful.

A water proof test followed, with both of us using a watering can to simulate rain. The umbrella was of course very good at repelling water, but what we were interested in was is the paint going to run. Fortunately, the paint stayed where it was so all our hard work was not in vain.

Dave got in on the act, holding the umbrella while I tried to get a better angle as well as showing off the view from underneath.
The view from the underside.
Looking closely, the original print of each leaf is still visible on the underside, giving a new dimension to the piece.
The veins of the original leaf prints are still visible from under the umbrella.
Suffice it to say, I think this was a successful experiment. The resulting umbrella is eye catching, autumnal and colourful. Considering one of the artists was six, I think we did a good job.

Thursday 4 August 2016

A phone cosy

A few weeks ago, after nearly four years of loyal service my mobile phone died. It was particularly annoying because as far as I could tell, the problem was a software one to do with the Android OS rather than anything hardware related. In the end, I had to remove a key piece of Android software and because it would silently reinstall every time the phone connected to the internet, it became useful for voice calls and text only.

Reluctantly I bought a new phone, which naturally needed a new case to protect it while in my bag.

Rather than buy a cheap plastic case, I decided to make one and chose some left over Peaches & Creme cotton to do so.

After looking through my stitch dictionaries and crocheting a few swatches, I decided I'd try alternate 'shallow crochet'.

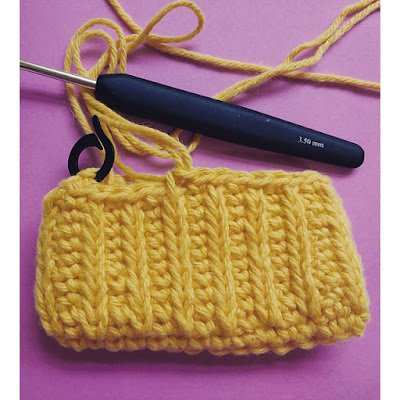
Shallow crochet stitches are spiked double crochet, i.e. worked into the top of the stitch on the row below the current working row. I wanted to work tightly, but a swatch of pure shallow stitches was too stiff and very hard on the hands. I elected for the alternate stitches instead which produces a firm fabric with vertical stripes of 'V's which look a bit like knitted stitches.

To keep my phone safe from the many things I carry around, I wanted this to be fairly tightly as a piece so decided to work with a 3.5mm hook. I highly recommend a pointy tip, as the shallow stitch is firm, making it difficult to get the hook into.

I worked 30 dc in the round, starting with 15 foundation-dc, then turning and working 15 stitches into the base of the 15 fdc I'd just made.
Alternating shallow crochet stitches.
When I had 30 stitches, I joined with a slip stitch, 2ch, then worked a row of dc, finishing with another slip stitch to join.

After that, I started working alternate shallow dc stitches with normal dc in the round to give the ribbed effect.

It is a bit tricky picking up the loops of the previous row, but following the the strands of the base of the dc you'd normally be working into helps. The shallow stitch will result in a 'V'; in subsequent rows, aim your hook just above the point where the 'V' makes a point. If you look at the back of the work, you should see the hook come out just below the back loop two rows down.

Keep working in the round until the phone is just covered, then finish with a row of dc and then a row of crab stitch (reverse dc). I added a loop fdc half way around one side of the final crab stitch edging.

All finished, with a button added.
After that it was just a case of sewing on a suitable button.
All finished.
Final dimensions for my case were 10cm x 16cm.
Ready to keep my phone safe.

(As always, I am using British crochet terms.)

Monday 25 July 2016

We try some weaving

Last week, we had a go at basket weaving using a plastic milk bottle as a base, taking it with us as a group activity for our local home education group meetup. Along with the other children, M found it fiddly as the plastic kept bending inwards. She got the hang of it after a while, but at six years old, M likes quick projects that produce fast results. She wanted the basket and did a fair amount of the weaving without complaint, but half way through wanted me to do it for her. I helped of course, but pushed her a little into completing her basket herself. The results are charming and M loved it, immediately taking both baskets (I made one too) and claiming them for her own.
Simple baskets woven on plastic milk bottles. The handles are also made from milk bottle. I've used Duck tape on the tops and handle to finish.
I wanted to build on the experience, but without the frustrations M had experienced working on the plastic bottle.

A while back, Dave bought me a book called Weaving Without A Loom (Sarita R. Rainey). Now due to life busy-ness, I've not really had much of an opportunity to try any of the ideas in this book, but with M getting a little older and following on from last week's baskets, I wanted to try some of the easier projects to see how she got on.

I decided to start with paper weaving, as the supplies are readily available around our house. We had a go at home so I could give M one to one attention, before taking the same craft to group the next day.

The idea is simple, we drew an outline in crayon onto a piece of construction paper, incorporating an area in the design to weave and representing it with parallel lines. The lines don't have to be regular in shape or length, they are there to be woven into. The design was cut out and the lines were also cut, making slits.

If I was doing this on my own, I'd have probably used a craft knife and mat, but doing this with M we used children's safety scissors. The lines weren't as crisp, but more than acceptable.

For our first attempt, I suggested we make trees as we are doing a project on trees at the moment. I also thought the shapes would be easy to draw and incorporate some weaving.

Once the design had been cut out, we cut some strips in a contrast colour and wove them through the slits. The ends were secured with a glue stick, then the whole thing is glued onto another piece of construction paper.
My design is on the left, M's is on the right.
In my case, I decided to cut the resulting design out, which could then have been used in another picture to complete the design.

M preferred to leave hers on the contrast paper as it was.

I thought it worked well. M had completed the brief, we both had acceptable woven paper designs, but M wasn't happy. She said my tree was beautiful but didn't like hers. I thought it was lovely, very Dr Seuss like and said so, but M protested that she wasn't trying to make a tree look like something out of a Dr Seuss book.

I suggested that maybe trees didn't inspire her in terms of art and that perhaps she could incorporate the weaving into another design. M's little eyes lit up and she immediately started a second picture, on a topic more to her liking.
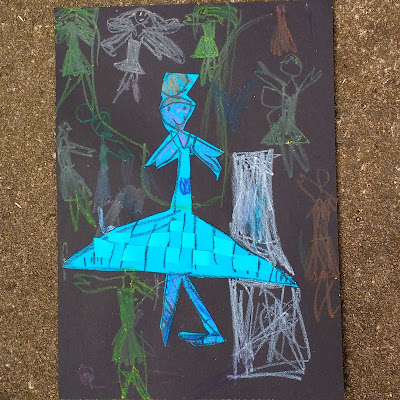
M's ballerina with a woven tutu, complete with background figures. M elected to weave in a slightly different shade of blue.
And next day, without any instruction or help, she produced another similar piece at the home ed group.
M's dancer.
I meanwhile decided to make a goldfish.
My goldfish.
Paper weaving like this is certainly doable for small children. Her own designs have a certain charm and stand well on their own as pieces of art. I liked my own goldfish a lot. It was easy to create and I could see how it would build up into an interesting and eye catching collage.

Saturday 9 July 2016

A girls first bike ride

Today's achievement was to get the tag-along bicycle up and running.

This has taken Dave a few weeks to achieve and it still needs some tweaking, but today we finally got to take the bike to the park for its inaugural ride.

M was super excited and could hardly wait as first Dave tried towing the tag-along, then I had a go before we allowed her to hop on. It has been about seven years since I last cycled, so the pressure was on not to fall off as I was the first one to pull M around the park. It was hard work! M has no bicycle experience, so doesn't know how to lean and was laughing a lot as we set up, leading to a lot of wobbling. Thankfully, I managed to pull out of the wobble but it was touch and go a few times. Hair raising stuff.
Dave and M, trying out the tag-along.
Once we were off, Dave and I took it in turns riding around the park for the next half an hour or so, before I declared it was time to stop. M didn't protest too much as I suspect her bottom had begun to go stiff. Instead she had fun playing with a couple of children for a little while, then we walked home.

I'd call the ride a success, but we might need to practice a bit to build up stamina for the Coventry Skyride, which we're booked onto at the beginning of next month.

Thursday 30 June 2016

The Daddy Umbrella

Going back a couple of months to the beginning of May, May Day weekend saw us visit Clun for their Green Man Festival. Sadly, Dave's umbrella was a casualty of the battle between winter and spring. The weather was bad, with heavy rain and strong winds. A gust took Dave's umbrella, pulling it inside out and snapping the struts holding up the canopy.

M noted the loss and promised Dave a new umbrella for Fathers Day.

So began operation Daddy's Umbrella.

M and I talked, discussing what sort of umbrella she'd like to give to him and before you know it, M's talking about decorating an umbrella to make it special. This meant I had to swing into research mode, working out how she could decorate an umbrella without affecting its practical use.

We took to the internet, spending some time looking at pictures, M sketched out ideas and together we came up with a plan. M would paint an umbrella for Fathers Day.

The only issue was trying to find an umbrella!

Trying to find a plain white or blue umbrella locally proved impossible. We did buy some plain umbrellas for practice, but nothing that suited M's plans. In the end, we came across the Jolly Brolly website, M approved and two weeks before Fathers Day, the umbrella was delivered.

In the meantime, I'd also bought acrylic paint and fabric medium. Acrylic paint is normally water resistant, but it doesn't apply well to fabric. It is too thick, changes the consistency of fabrics and is prone to cracking when dry. Fabric medium can be added to acrylic, thinning it and reducing the impact of the paint on fabric. The plan was to use a 50/50 mix of medium and paint, allow it to dry and then fix it using an iron. Naturally, I'd use a pressing cloth to protect both the iron from the paint and the umbrella from excessive heat. I'd also taken care to avoid acquiring an umbrella with a plastic canopy as that would have resisted the paint and most likely melted at the sight of an iron.

M and I agreed that we needed a stunt umbrella. A semi-sacrificial umbrella, that she could paint to test the technique and prove it would result in a usable brolly where the paint stayed put. M decided that she would paint the Northern Lights coming across mountains. We looked at many pictures of the Northern Lights and M got started.
M paints her first umbrella.
Two hours and one painted sock later, we had an umbrella covered with swirls and dramatic mountains. It retired to the shed to dry for three days and then I ironed it. M volunteered to stand under it while I used a watering can to test how waterproof the paint was. Thankfully the paint stayed put and M was dry, at least until it was my turn to stand (or crouch) under the umbrella while M tested it with a watering can. M learned that water runs off an umbrella and if you are standing close to the overhang, will pour all over you.
The Northern Lights umbrella.
Satisfied with the result, we set the umbrella aside to dry and M worked on the design for the Daddy umbrella.

Several sketches later, M told me she wanted to paint the word DADDY around the rim with hearts above it. She would then paint pictures of Dave in various weather types above the hearts.

We had a plan and got started. I mixed the paint/fabric medium, M painted. I grabbed a brush and applied a second layer of paint, following M's lead. It took a long time and we started with the DADDY and hearts. The umbrella was a full sized golfing umbrella and huge, which presented problems for M who is not very tall and would be leaning over wet paint. I suggested we allow the hearts to dry, then paint in the Daddy's a couple of days later. M agreed, but this meant the umbrella was not finished in time for Fathers Day. We also decided to use sharpie pens to draw the outlines for the figures and pick out the edges of the hearts.
The finished Daddy Umbrella.
Finally however, after four days of drying time it was ready. I ironed it, we tested it and declared it done.
I think anyone seeing this will know it's owner is a Daddy.
As you can see, it is a sizeable umbrella and Dave should be very recognisable as a Daddy when out and about in the rain.
A very happy M who is pleased with the result.
M is happy and we may need to paint more umbrellas in the near future.

Useful websites:

Saturday 4 June 2016

One last time

About a week ago, I finished the blue cotton cardigan I started for M back in March. Considering I swatched for this project in February, this means it has taken me over three months to knit a garment to fit a nearly six year old. I really am not a speedy knitter these days. Fortunately, M had asked for a summer cardigan so my timing is impeccable.

After a lot of thought, I decided to make the Sirdar simple cardigan one more time. I've already made this pattern twice before (last year and in 2014), so it was a familiar make. I wanted to make the cardigan in a size bigger than M, so for a 7-8 year old, which presented a challenge as the Sirdar pattern only goes up to 6-7. I was all set to rework the numbers, but started with my swatch and no matter how I tried I could not get my chosen yarn (Drops Muskat) to come out to the specified gauge of 22 stitches x 28 rows in stocking stitch gives a 10cm square.

I had two choices:

3.75mm needles 21st x 28 rows = 10cm
4mm needles 20st x 26 rows = 10cm

I could have tried dropping needle size again, but was worried about drape and ending up with a cotton cardigan which was too stiff.

After working the numbers, I decided to knit this cardigan with 4mm needles. The resulting gauge made the piece a couple of centimeters bigger across the chest, bringing the expected size closer to that needed for an eight year old, which was what I needed.
A finished cardigan.
Having made this cardigan before, I decided to mix things up a bit by adding stranded colour work to the bottom of the body and sleeves. This was a new technique for me and keeping tension even proved tricky, but I was pleased with the effect which was very pretty.
The back view.
I was astonished at how quickly this cardigan ate the Muskat. The pattern predicted seven balls and I'd bought eight. By the time I'd finished the back, I knew I'd be in trouble as I'd gone through nearly three balls! By my estimates, I'd run out of yarn on the second sleeve... So I hastily bought another five balls of the same dyelot, because I wanted enough left over to add to another project. I am so glad I did, as this project used nine balls of the main colour and one ball of the contrast.

The original Sirdar pattern calls for a knitted border, but the first time I made this I found the border wouldn't lie flat and the collar was messy. I much prefer a crochet border, so I decided to do my own thing.
Getting adventurous with the collar.
Stranded knitted colour work, with a spiked treble, eyelet and scallop edging.
M wanted a ribbon and a turquoise scallop to match the turquoise stranded work, I fancied doing some tiny scallops and spiked stitches, so we ended up with all of those things incorporated into the bottom hem, fronts, collar and cuffs. While I enjoy knitting, I'm more confident with crochet and as such I'm happy to experiment. At one point I was afraid I'd overdone it, but after the last stitch was placed, I decided the crochet finish brings the final garment alive. Finally, M chose the button to match during a trip to the local yarn store.
Collar and front.
The end result is a very pretty cardigan. It is deliberately too big, which is why it currently sits more like a jacket, but by this time next year I think it will fit my daughter well. She may even get a third year out of it!
A happy little girl.
M loves it, so everyone is happy.

Thursday 26 May 2016

Simply lace shawl

I finished this shawl over 18 months ago, put aside to block and completely forgot about it. I finally remembered it a couple of weeks ago, meaning I've been sat trying to remember what I did! Mostly this means studying the shawl, thinking back and being quietly amazed that something I made is this pretty.
Finished shawl. Isn't it pretty?
I started this shawl back in August 2013. It was intended as a long term travelling project which I could work on wherever I was, picking it up and putting it down as necessary. These days, time for craft is limited to random snatched moments around everything else, which has drastically impacted on my ability to actually make stuff, remember stitch patterns, maintain even tension or keep things from unravelling.
The main panel with its border.
My aim with this project, initially at least, was to make something that wouldn't matter if it wasn't finished. I wanted something to carry around, that would keep my hands busy, wouldn't require me to look at it or pay particular attention to what I was doing and would pack down small.

Lace might seem like an odd choice for this category of project, but if you choose a well behaved cotton thread and keep it clean (which for me meant the project lived in a plastic zip lock bag, inside a cotton bag), it is no different to working anything else. Cotton thread is thin but strong, the hook is tiny and the stitches are teeny but will open up on blocking to reveal their beauty.

I started off by deciding to use stash thread left over from another project. I  planned to make a rectangular panel and put a border on it. My thought was to keep going with the rectangle until it was big enough or I ran out of thread. At that point, I’d put either a border or end panels on, using a contrasting thread if the original thread ran out.

I didn't run out of thread, although there was a horrible moment, one row from finishing the border when I thought I was in danger of doing so! Fortunately, I managed to get that row made, otherwise I suspect this shawl would still be sitting in my working heap.
Overall this was an easy crochet. The repeat pattern was both simple to remember and intuitive to follow. The thread was well behaved and travelled well. I worked on it at home, soft-play centres, parks, nature reserves, historical houses and anywhere else that I found myself with a few minutes to spare. There were a few worrisome moments when I lost the teeny tiny hook down the side of the sofa, but otherwise it just kept growing. The main requirement was persistence on my part and the whole thing took approximately fourteen months to complete.
My daughter likes the shawl very much and has asked if I can make her one of her own.
Final Size
Unblocked - 43cm x 186cm
Lightly blocked - 46cm x 233cm
Final size after a light blocking was 233cm.
Yarn
Circulo Clea which is a #10 count sized thread in 100% cotton.

I had some white Clea thread in my stash, leftover from making a gentleman’s nightcap. I’d bought two balls initially, but only used about half a ball on the hat. From past experience, I remembered the Clea to be very soft, but easy to work with. The softness being important as I wanted a wearable shawl, so while I wanted to use a cotton thread I didn’t want something stiff and scratchy in the way of a thread more suited for doilies.

Hook
Worked with a 2mm hook.

My first stop involved flicking through the many stitch dictionaries I own to find a suitable pretty, not complicated stitch pattern, but with enough going on to keep my interest for months and months and months. I eventually settled on a shell trellis from The Harmony Guides:Basic Crochet Stitches.

I swatched with a 2mm, 2.5 and 3mm hook. Each swatch was washed, blocked and tested for softness. Eventually I settled on the 2mm hook as giving the best result with this thread.

Tension
I didn’t measure gauge or tension, I simply started with the correct multiple of stitches for my pattern and increased until I thought the shawl would be wide enough. The swatches indicated that the finished piece would be be stable in terms of width, only growing a little under blocking but I could expect considerable increase in length as the pattern opened up.

Foundation Row
I personally hate using chain foundations unless absolutely necessary. I find them fiddly, difficult to work the first row into and they can come out at a different tension to the rest of the piece, leading to either puckering or bowing. My preference is for the chainless foundation (or fdc using British notation) which works one stitch at a time, extending the row by placing a single chain in the previous stitch to act as a base for the new stitch. So much easier!

In this case, to support the shell and trellis, I started with a multiple of 12+1 stitches of fdc.

Main Panel
The main panel has a basic shell and chain trellis stitch, taken from one of the Harmony Guides.

This stitch pattern has repeating alternate rows of chain, then 5tr shells with 5ch in between each shell. The shells are worked and anchored at the sides, to the middle chain in the 5ch space of the row below using a dc. I've staggered the shells, rather than stacking them, to give the diamond effect because I thought it was more visually interesting. The chain between the shell rows is anchored with a dc into either the middle ch or tr (as appropriate) of the previous row. I just worked in pattern, putting a half shell (3ch, 2tr) at the beginning/end of the row as needed.

i.e.
Row 1 - 3ch, 2tr into the same stitch to form half a shell. *Skip next 2 fdc from previous row, 1dc into next fdc, work 5ch, skip 5 fdc, 1dc into next fdc, skip 2 fdc, 5tr into next fdc forming next shell, repeat from *. End last repeat with 3tr into the last fdc. Turn.

Row 2 - 1ch, 1dc into first stitch (last tr from previous row). *5ch, 1dc into next 5ch space, 5ch, 1dc into 3rd tr on next 5tr shell, repeat from *. End last repeat with 1dc into the top of the turning chain of the previous row. Turn.

Row 3 - *5ch, 1dc into next 5ch space, 5tr into next dc to form a shell, 1dc into next 5ch space, repeat from *. End last repeat with 2ch, 1tr into last dc, skip turning chain. Turn.

Row 4 - 1ch, 1dc into first stitch (last dc from previous row). *5ch, 1dc into 3rd tr on next 5tr shell,  5ch, 1dc into next 5ch space, repeat from * to end. Turn.

Row 5 - 3ch, 2tr into the same stitch to form half a shell. *1dc into next 5ch space, 5ch, 1dc into next 5ch space, 5tr into next dc forming a 5tr shell, repeat from *. End last repeat with 3tr into the last dc, skip turning chain. Turn.

Repeat rows 2 - 5 until the piece is big enough.

Border
Once the main panel was complete I decided to start on a border. Not having much thread left, I couldn’t make it too elaborate so decided on a simple feather and shell trim. I sketched it out on a piece of paper, stacking 5tr shells which are then extended to widen the ‘feather’ at the top with a picot edge to finish.

I didn’t break the thread, but continued straight from the main panel to the border by reaching the end of  row 5, adding a corner chain, then repeating the 3tr half shell around the corner. Row 5 of the last repeat on the main panel became the start of Row 1 of the border as I was now working in the round.
Close up of a corner.
I would normally work a row of dc around a piece to form a good foundation for any border, but with thread running out I decided against it. The first row of the border starts out very like rows 3 or 5 of the main panel, so I simply placed the 5tr shells and anchoring dcs where it seemed appropriate.

Row 1 - continue straight on from row 5 of the main panel, working in the round and turning the corner by 2ch. 3tr into the same stitch forming another half shell (corner turned). Continue as for Row 5 of the main panel around the sides of the shawl. At the corners, turn with 3tr, 2ch, 3tr in the same stitch. When you reach the beginning of the last row of the main panel, end row with 3tr, 1ch and join to the top of 3rd or top turning chain with 1dc. This last dc will place you in the middle of the equivalent to a 2ch space.

Row 2 - 1ch, 1dc into same 2ch space. 2ch, 5tr into next tr. *2ch, 1dc into 5ch space, 2ch, 5tr into 3rd tr of next shell. Repeat from * to next corner. At corner 5tr into the 3rd tr of the half shell from the previous row, 2ch, dc into 2ch space, 2ch, 5tr into next tr. Corner turned. Continue working pattern between *s, treating each corner in a similar manner. At the end of the row, end with 2ch and ss into the first dc.

Row 3 - 1ch, 1dc in top of joining dc. *2ch, 5tr into 3rd tr of next shell, 2ch, 1dc into next dc, repeat from * until end. Corners should now be set up to be treated as for the rest of the row. At the end of the row, 2ch and ss into first dc.

Row 4 - 1ch, 1dc in top of the same dc, *2ch, 1tr in 2nd tr of next shell, 5tr in next tr (3rd tr of the shell), 1tr in next tr, 2ch, 1dc into next dc, repeat from * until end. At the end of the row, end with 2ch and ss into the first dc.

Row 5 - 1ch, 1dc in top of the same dc, *2ch, skip 1tr, 1tr in each of the next 2 tr, 5tr into the next tr, 1tr in each of the next 2 tr, 2ch, 1dc into the next dc, repeat from * until end. At the end of the row, end with 2ch and ss into the first dc.

Row 6 - Follows on from the pattern laid down in rows 4 and 5, but adds a picot-4 to each alternate tr as it is worked. i.e. 1ch, 1dc in top of the same dc, *2ch, skip 1tr, (1tr, picot-4) into next tr, 1tr in next tr,(1tr, picot-4) into next tr, work 5tr into next tr adding a picot-4 to the 2nd and 4th tr, (1tr, picot-4) into next tr, 1tr in next tr, (1tr, picot-4) into next tr. 2ch, 1dc into next dc. Repeat from * until end.

Join final round with a slip stitch into the first dc, break thread leaving the tail long and pull through.
Blocking.
Block lightly and the weave in the ends before clipping them.